> ## Documentation Index
> Fetch the complete documentation index at: https://docs.shiftupai.com/llms.txt
> Use this file to discover all available pages before exploring further.
# ShiftUp Integration Setup
> One-time setup actions required after package installation. ShiftUp provides a streamlined setup experience that will guide you through the following steps:
1. Assign the **ShiftUp Admin** permission set to the current admin user.
2. Assign ShiftUp permissions to your selected integration user.
3. Assign additional standard object and system permissions to the integration user.
4. Authorize the ShiftUp integration.
5. Activate ShiftUp AI services.
6. (Optional) Align org-wide sharing settings with your Account sharing model.
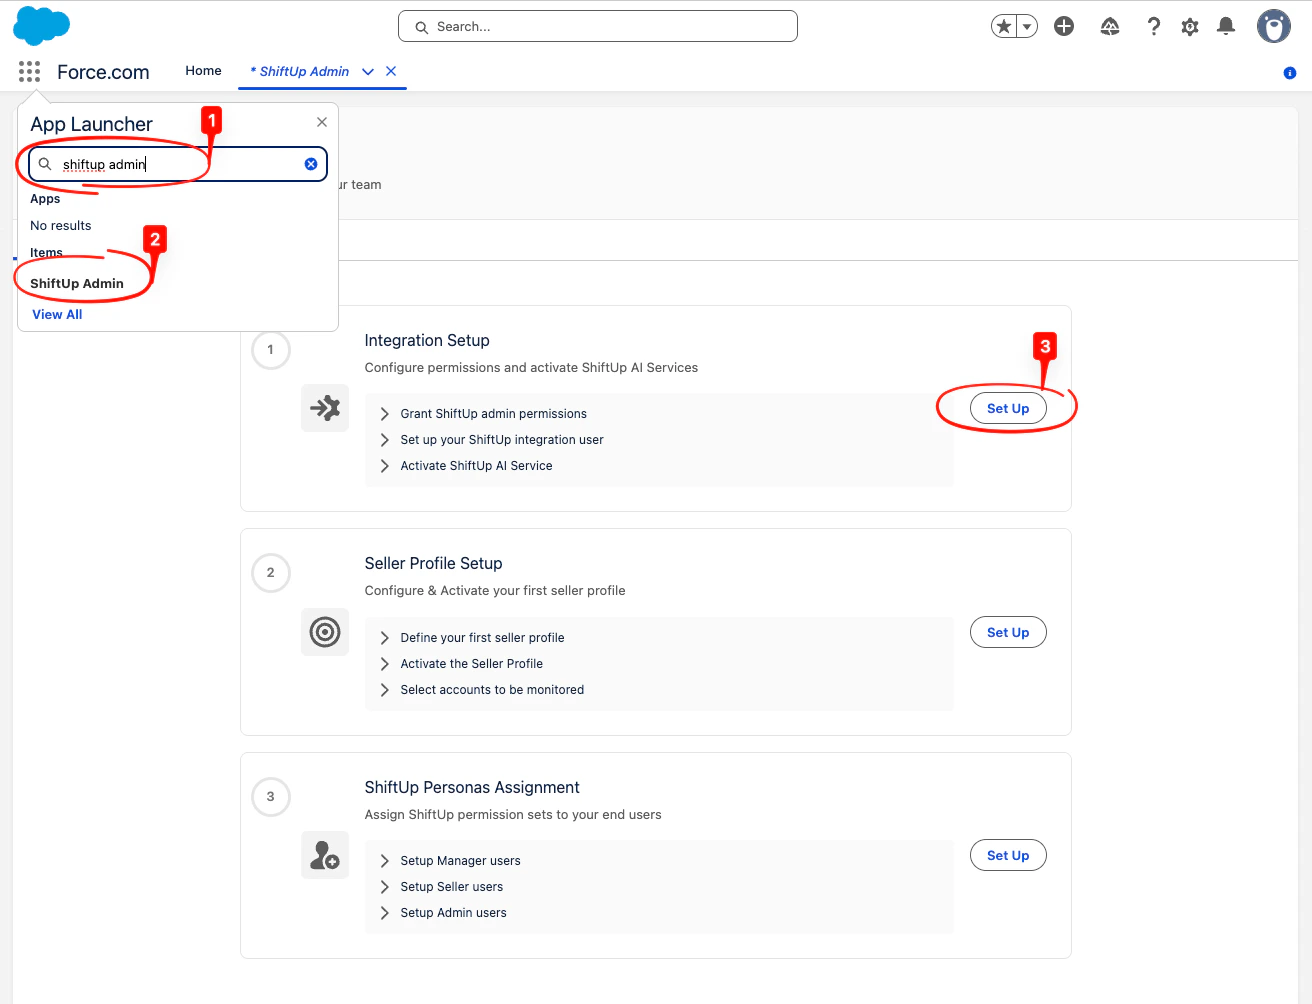
To begin the setup, click the app launcher icon and search for `ShiftUp Admin`, then click on the tab and click the `Set Up` button in the `Integration Setup` section.
 ## 1. Assign the ShiftUp Admin permission set
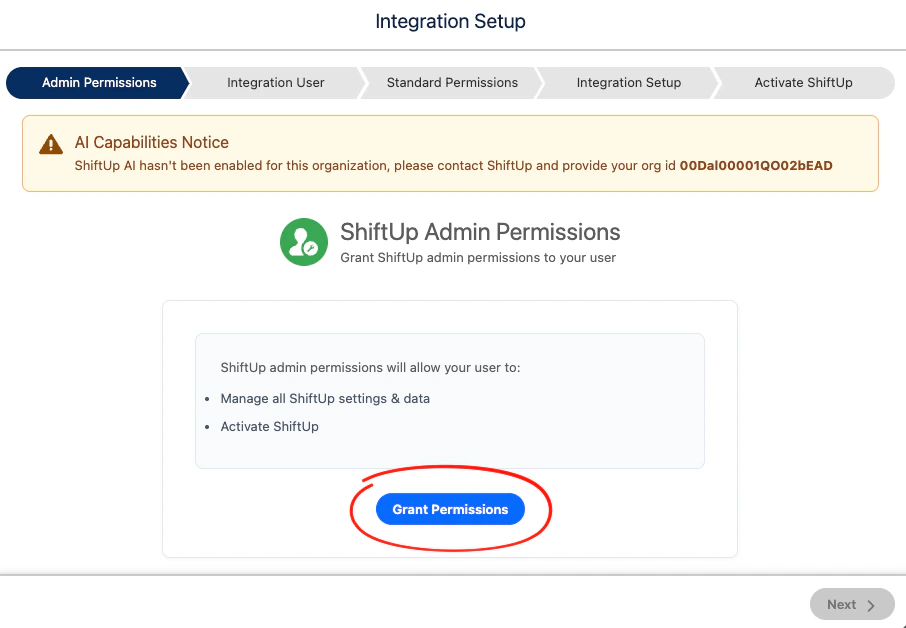
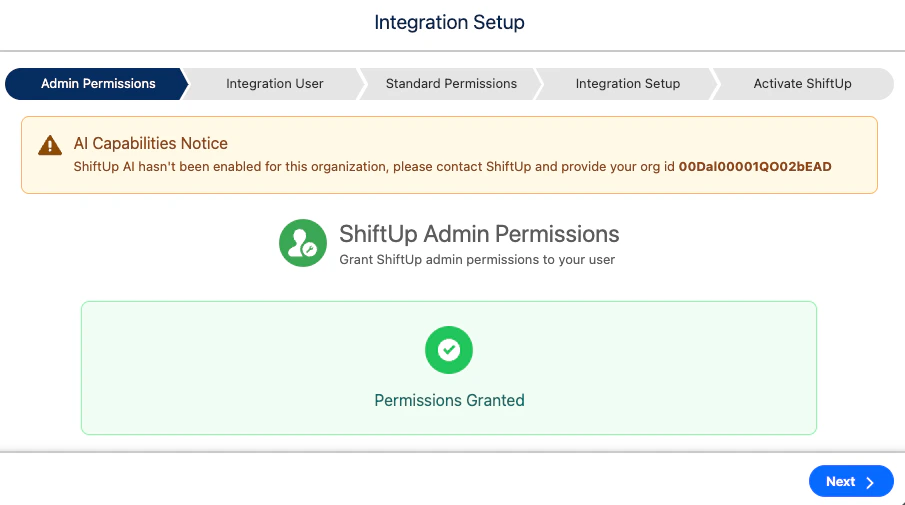 > NOTE: If you see the AI Capabilities Notice banner, share your Salesforce Organization ID (00D...) with ShiftUp for activation. Otherwise, you won’t be able to complete the final step of the wizard.
## 2. Assign ShiftUp permissions to selected integration user
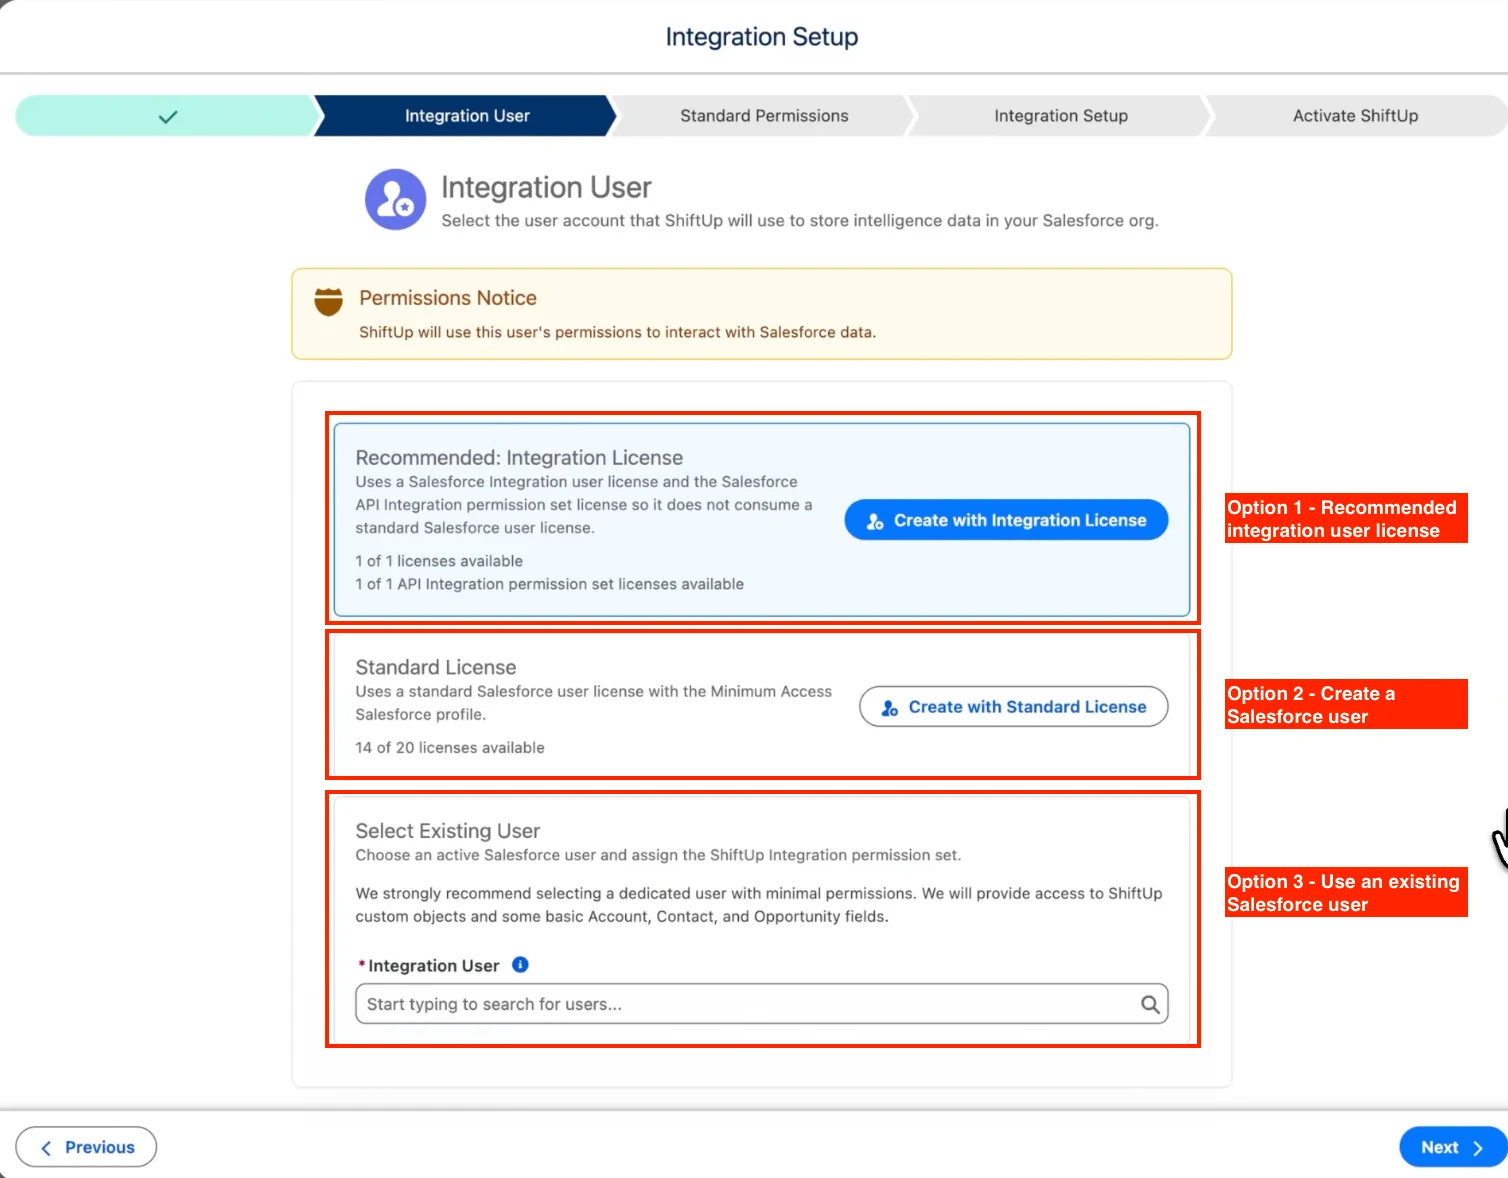
This step picks the user that ShiftUp will use to read and write data in your Salesforce org. The wizard offers three options. The first option is **recommended** because it does not consume a paid Salesforce user license.
### Option 1 (Recommended): Create with Integration License
ShiftUp creates a dedicated integration user that uses a **Salesforce Integration** user license plus the **Salesforce API Integration** permission set license — neither of which counts against your paid Salesforce user licenses.
Use this option when both of the following are true:
* Your org has at least one available **Salesforce Integration** user license.
* Your org has at least one available **Salesforce API Integration** permission set license.
The wizard reports remaining counts for both licenses inline. If either is unavailable, the **Create with Integration License** button is disabled and you'll need to use Option 2 or Option 3.
To use this option, click **Create with Integration License**. ShiftUp provisions a dedicated user named "Integration ShiftUp," assigns the **Minimum Access - API Only Integrations** profile, and attaches the Salesforce API Integration permission set license.
Salesforce Integration licenses and Salesforce API Integration permission set licenses are included with most editions of Sales Cloud. Check `Setup` > `Company Information` to see your available counts before running the wizard.
### Option 2: Create with Standard License
ShiftUp creates a dedicated integration user that uses a **standard Salesforce user license** with the **Minimum Access - Salesforce** profile.
Use this option when you don't have Salesforce Integration licenses available and you have a spare standard Salesforce user license you're willing to dedicate to the integration.
To use this option, click **Create with Standard License**.
### Option 3: Select Existing User
Choose an active Salesforce user that already exists in your org. ShiftUp assigns the **ShiftUp Integration** permission set to that user.
We strongly recommend selecting a **dedicated user with minimal permissions** rather than a real human user, so the integration's access stays auditable and scoped. ShiftUp will use this user's permissions to read and write data, so granting the integration broader access than necessary increases your risk surface.
Search for the user, select them, and click the assign button to add the ShiftUp Integration permission set.
> NOTE: If you see the AI Capabilities Notice banner, share your Salesforce Organization ID (00D...) with ShiftUp for activation. Otherwise, you won’t be able to complete the final step of the wizard.
## 2. Assign ShiftUp permissions to selected integration user
This step picks the user that ShiftUp will use to read and write data in your Salesforce org. The wizard offers three options. The first option is **recommended** because it does not consume a paid Salesforce user license.
### Option 1 (Recommended): Create with Integration License
ShiftUp creates a dedicated integration user that uses a **Salesforce Integration** user license plus the **Salesforce API Integration** permission set license — neither of which counts against your paid Salesforce user licenses.
Use this option when both of the following are true:
* Your org has at least one available **Salesforce Integration** user license.
* Your org has at least one available **Salesforce API Integration** permission set license.
The wizard reports remaining counts for both licenses inline. If either is unavailable, the **Create with Integration License** button is disabled and you'll need to use Option 2 or Option 3.
To use this option, click **Create with Integration License**. ShiftUp provisions a dedicated user named "Integration ShiftUp," assigns the **Minimum Access - API Only Integrations** profile, and attaches the Salesforce API Integration permission set license.
Salesforce Integration licenses and Salesforce API Integration permission set licenses are included with most editions of Sales Cloud. Check `Setup` > `Company Information` to see your available counts before running the wizard.
### Option 2: Create with Standard License
ShiftUp creates a dedicated integration user that uses a **standard Salesforce user license** with the **Minimum Access - Salesforce** profile.
Use this option when you don't have Salesforce Integration licenses available and you have a spare standard Salesforce user license you're willing to dedicate to the integration.
To use this option, click **Create with Standard License**.
### Option 3: Select Existing User
Choose an active Salesforce user that already exists in your org. ShiftUp assigns the **ShiftUp Integration** permission set to that user.
We strongly recommend selecting a **dedicated user with minimal permissions** rather than a real human user, so the integration's access stays auditable and scoped. ShiftUp will use this user's permissions to read and write data, so granting the integration broader access than necessary increases your risk surface.
Search for the user, select them, and click the assign button to add the ShiftUp Integration permission set.
 Whichever option you pick, ShiftUp will only read and write the records and fields you grant the integration user access to. You can further scope access in Step 3 by tailoring the **ShiftUp Standard Permissions** permission set.
## 3. Assign Standard Permissions to the integration user
ShiftUp requires some permissions to standard objects which need to be explicitly approved in your organization. The required permissions are listed on the left side of the screen. We will take care of setting this permissions but we need to manually create the permission set "shell" first.
To create the permission set "shell", click on the `Manage Permission Sets` link in the screen:
Whichever option you pick, ShiftUp will only read and write the records and fields you grant the integration user access to. You can further scope access in Step 3 by tailoring the **ShiftUp Standard Permissions** permission set.
## 3. Assign Standard Permissions to the integration user
ShiftUp requires some permissions to standard objects which need to be explicitly approved in your organization. The required permissions are listed on the left side of the screen. We will take care of setting this permissions but we need to manually create the permission set "shell" first.
To create the permission set "shell", click on the `Manage Permission Sets` link in the screen:
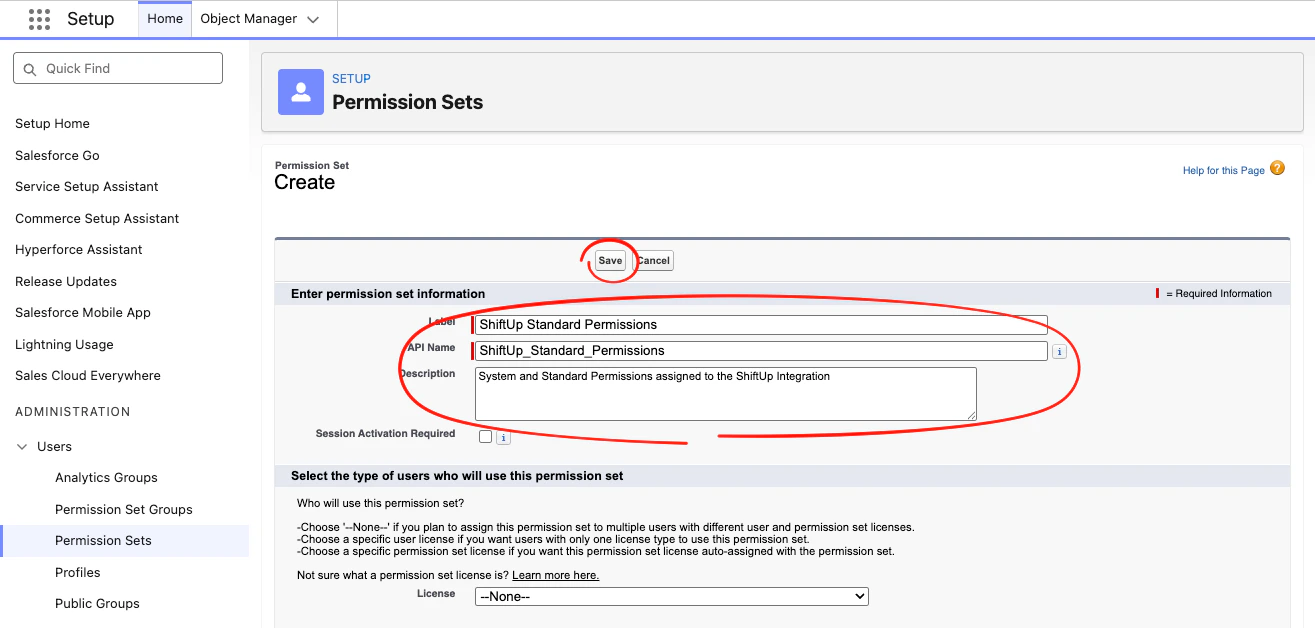
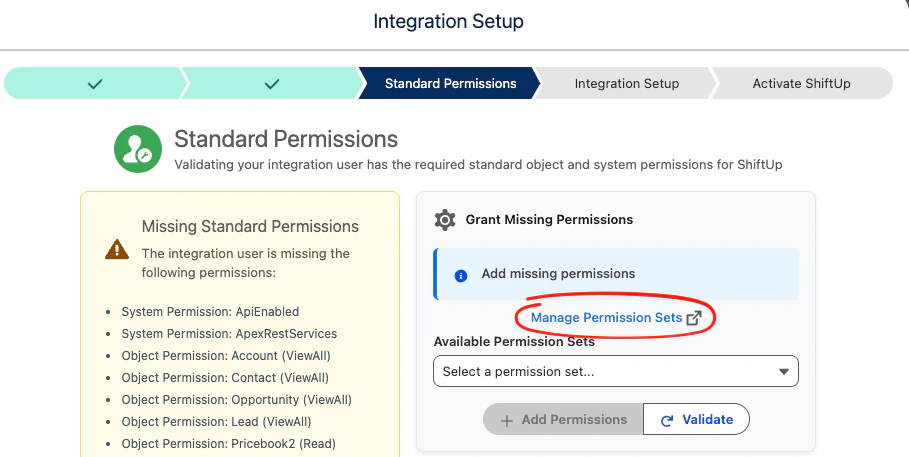 This opens the `Permission Sets` setup page in a new tab. In that tab, click `New` at the top of the list, create a permission set named `ShiftUp Standard Permissions`, and then click `Save`.
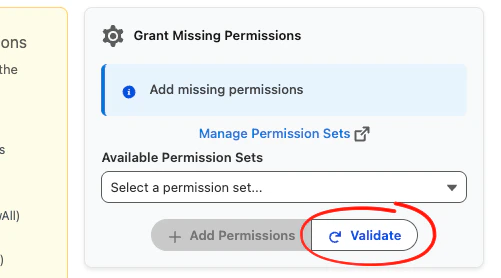
 Next, go back to the ShiftUp Admin tab and click the `Validate` button to refresh the list of available permission sets.
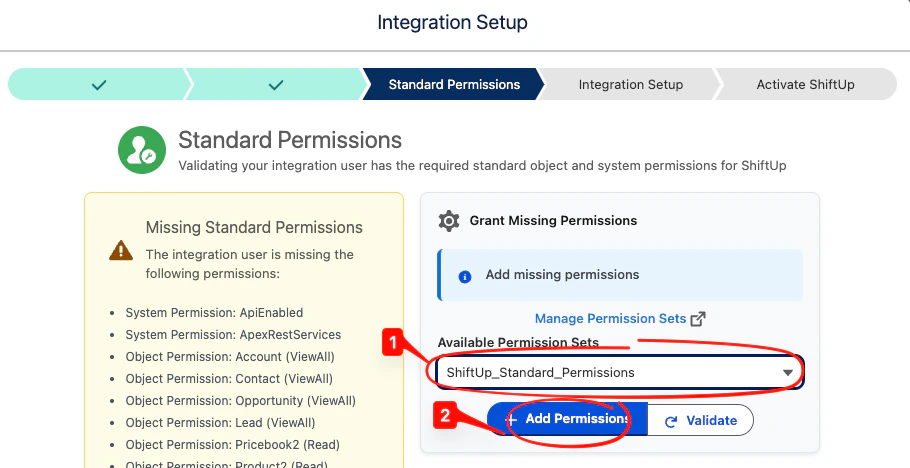
 Select the new `ShiftUp Standard Permissions` permission set and click the `Add Permissions ` button. Then click `Next` to move to the next step.
 ## 4. Authorize the ShiftUp integration
You now need to authorize the ShiftUp integration to run in the context of the user configured in Step 2. To do this, first copy the username of the designated integration user and then click the `Open OAuth Policy Configuration` button.
## 4. Authorize the ShiftUp integration
You now need to authorize the ShiftUp integration to run in the context of the user configured in Step 2. To do this, first copy the username of the designated integration user and then click the `Open OAuth Policy Configuration` button.
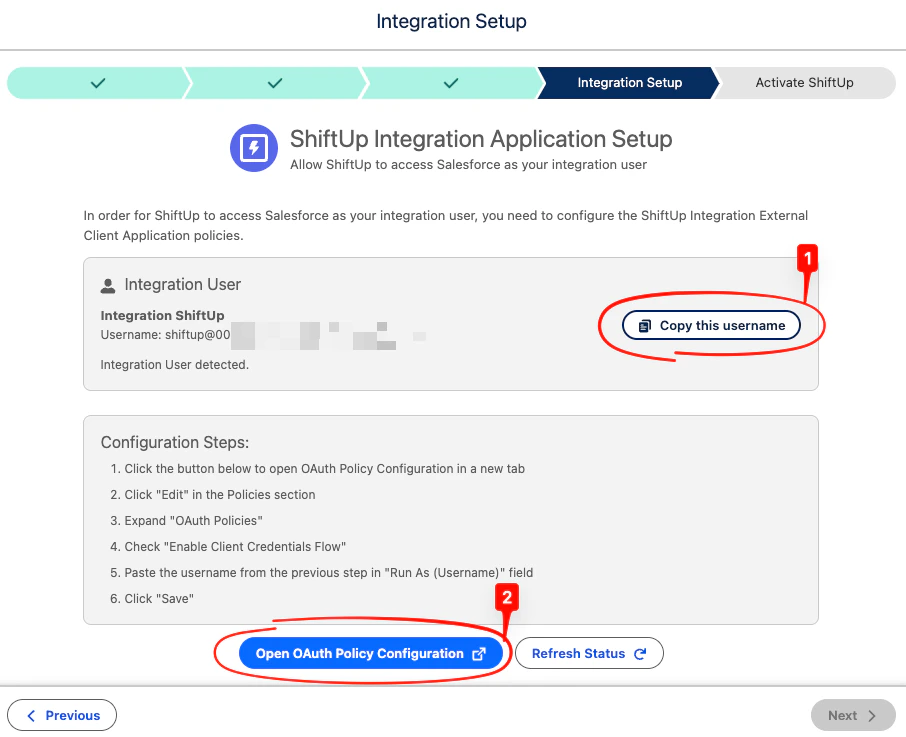 This will open the ShiftUp Integration External Client Application setup screen, where you will need to perform the following steps:
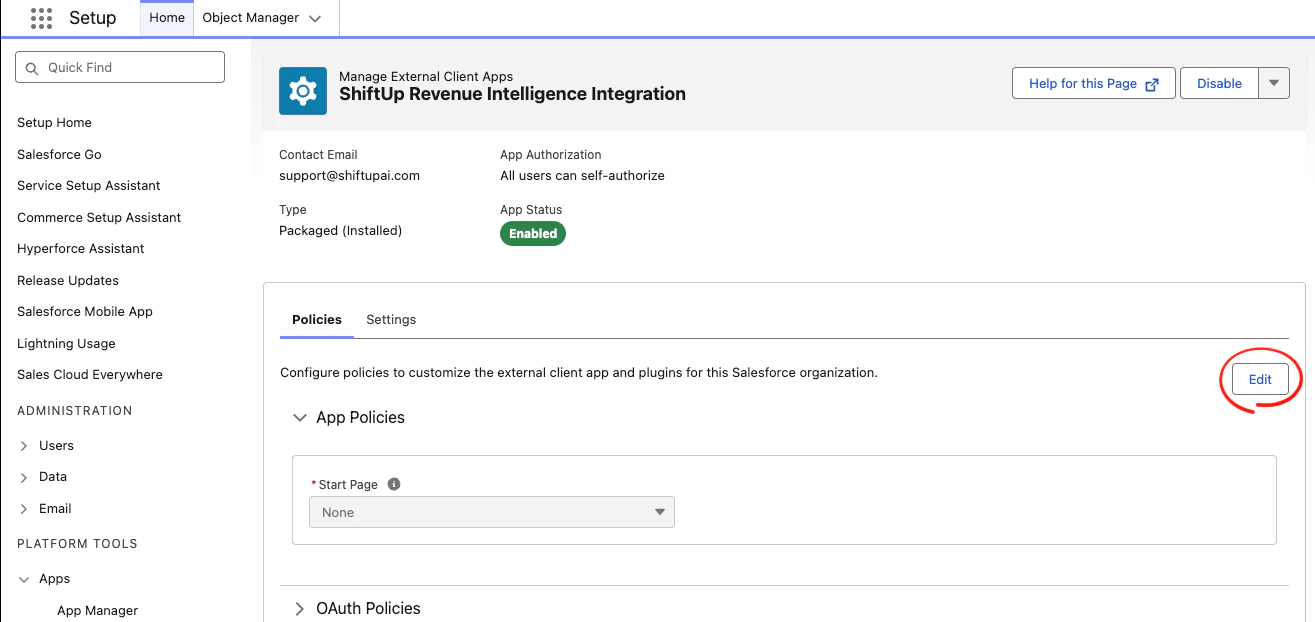
Click the `Edit` button in the `Policies` tab:
This will open the ShiftUp Integration External Client Application setup screen, where you will need to perform the following steps:
Click the `Edit` button in the `Policies` tab:
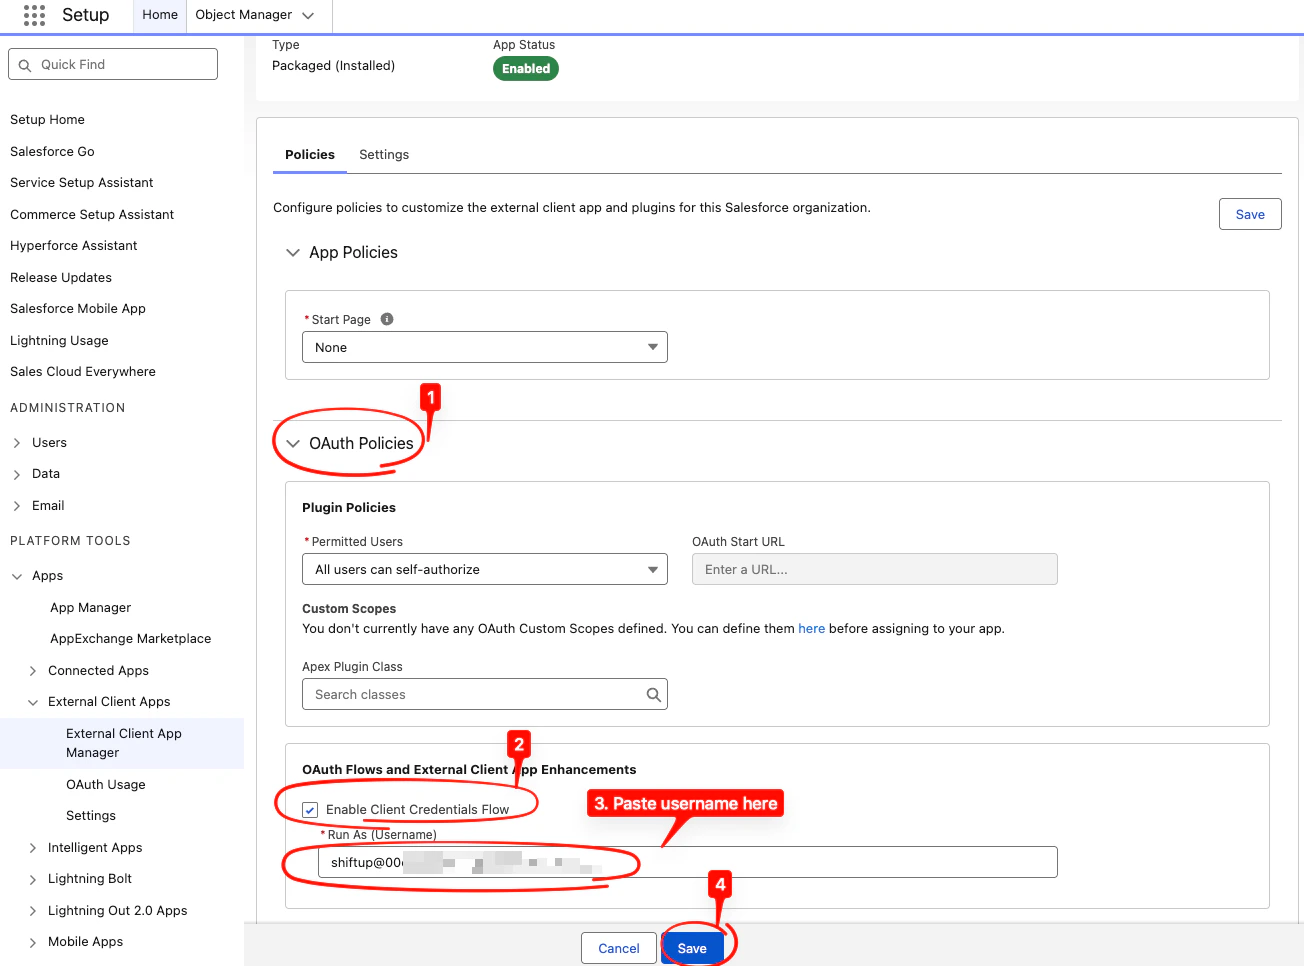
 Next, expand the `OAuth Polcies` section, check the `Enable Client Credentials Flow` , paste the integration username in the `Run As (Username)` field and click `Save`
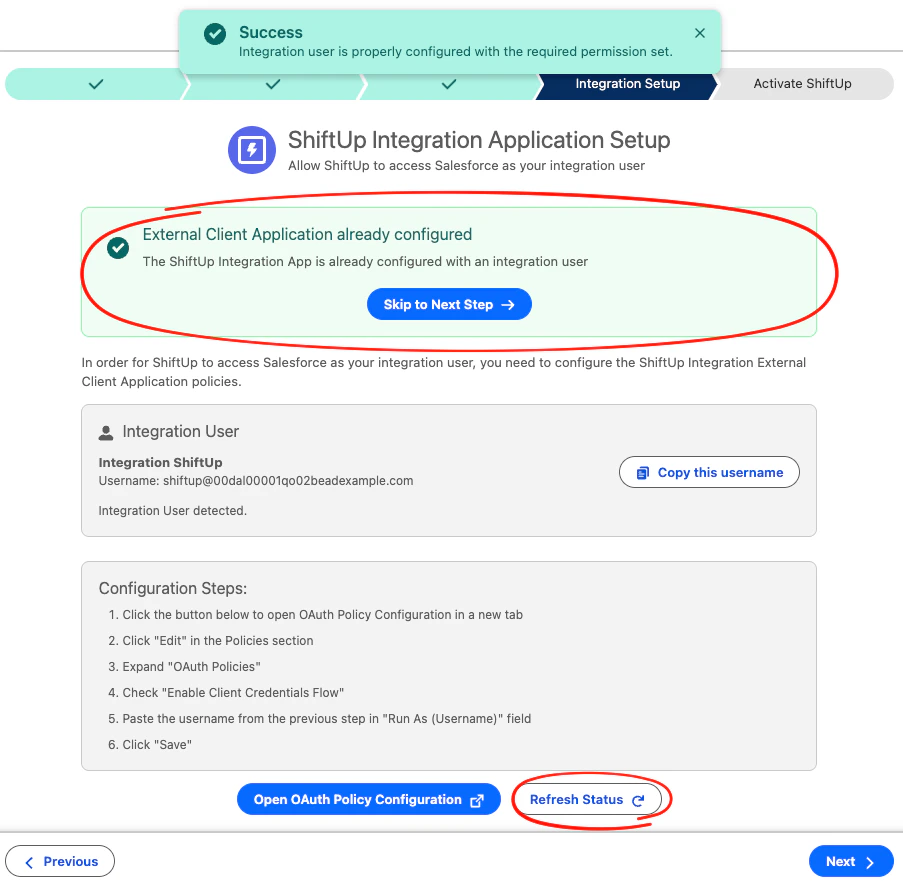
 Go back to the ShiftUp Admin tab, click the `Refresh Status` button to confirm the integration user authorization was set correctly and click `Next` to continue to the last step.
 ## 5. Activate ShiftUp AI services
Your org now has all the necessary permissions to start using ShiftUp, the last step is to activate the ShiftUp AI services for this org. To do this, we need to get some information about your user and organization.
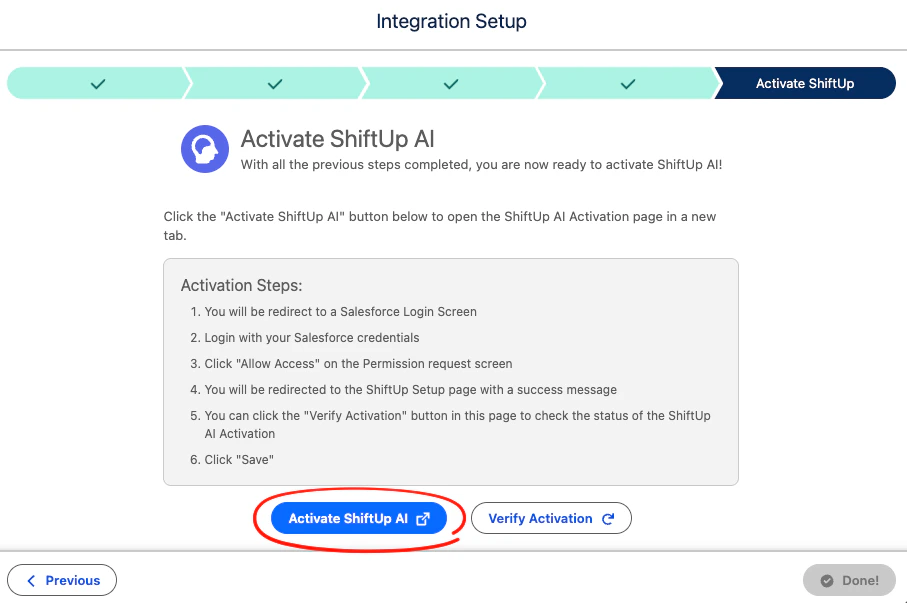
Click the `Activate ShiftUp AI` button to begin, this will take you a Salesforce Login screen in which you will enter your current user (Admin) credentials.
## 5. Activate ShiftUp AI services
Your org now has all the necessary permissions to start using ShiftUp, the last step is to activate the ShiftUp AI services for this org. To do this, we need to get some information about your user and organization.
Click the `Activate ShiftUp AI` button to begin, this will take you a Salesforce Login screen in which you will enter your current user (Admin) credentials.
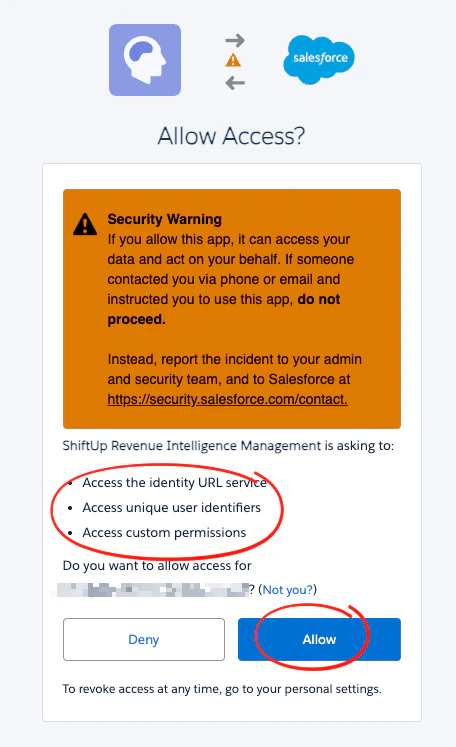
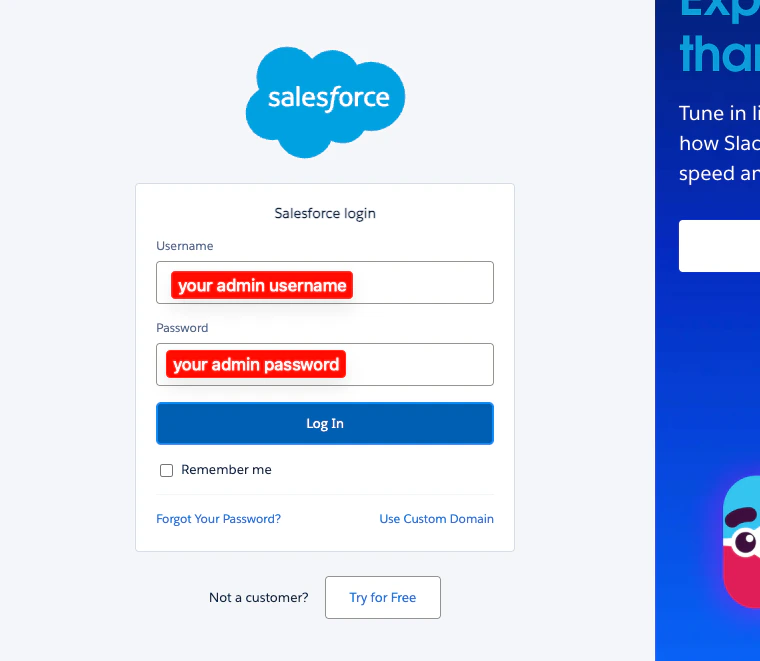 Next, you will be asked to allow ShiftUp to read some basic information about your org. Click `Allow`
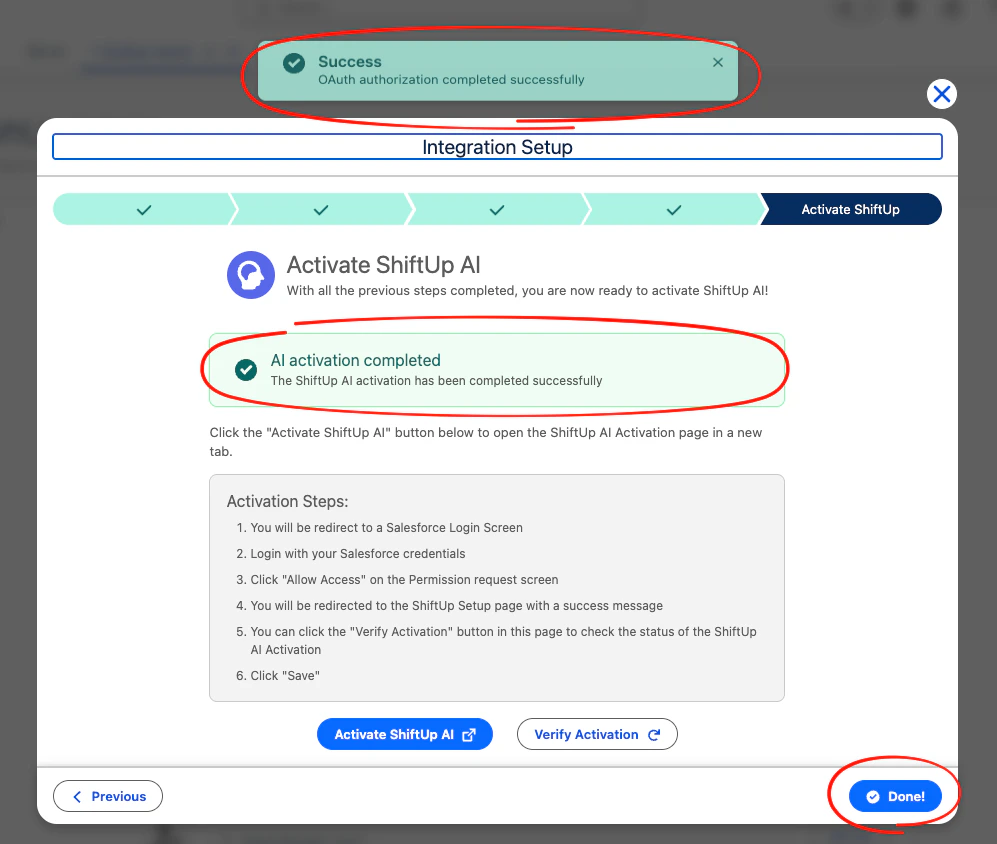
 Finally, you should be redirect back to the Integration Setup screen and a success message should indicate the activation has completed successfully. Finally, click `Done`
 ## 6. (Optional) Align ShiftUp Account Plan org-wide sharing settings
If a `Private` sharing model has been configured for Accounts in your Salesforce org, you can align the `ShiftUp Account Plan` object to also be `Private.`
To do this, go to `Setup` > `Security` > `Sharing Setting` , click the `Edit` button, then scroll down to the `ShiftUp Account Plan` row, change the `Default Internal Access` to `Private` and Save.
## 6. (Optional) Align ShiftUp Account Plan org-wide sharing settings
If a `Private` sharing model has been configured for Accounts in your Salesforce org, you can align the `ShiftUp Account Plan` object to also be `Private.`
To do this, go to `Setup` > `Security` > `Sharing Setting` , click the `Edit` button, then scroll down to the `ShiftUp Account Plan` row, change the `Default Internal Access` to `Private` and Save.