> ## Documentation Index
> Fetch the complete documentation index at: https://docs.shiftupai.com/llms.txt
> Use this file to discover all available pages before exploring further.
# Customize accounts created by Pipeline Agents
Use a Salesforce Flow to set required fields and default values on Accounts created by ShiftUp. This helps new Accounts meet your Salesforce validation rules and follow your team's conventions—for example, assigning an account type, record type, or custom classification before the record is saved.
The **ShiftUp Pipeline Account Before Create** flow runs when a strategy candidate activation creates a new target Account or supporting parent Account. Each new Account passes through the flow separately. Existing Accounts reused during activation keep their current field values.
## **Before you begin**
* Confirm your installed ShiftUp version includes **ShiftUp Pipeline Account Before Create** under Salesforce **Setup → Flows**.
* Use an administrator account with **Manage Flow** permission and access to the packaged flow.
* Identify the fields and valid values your org requires, and confirm which user is your ShiftUp integration user.
* Configure and test the override in a sandbox first.
## **1. Open the packaged flow**
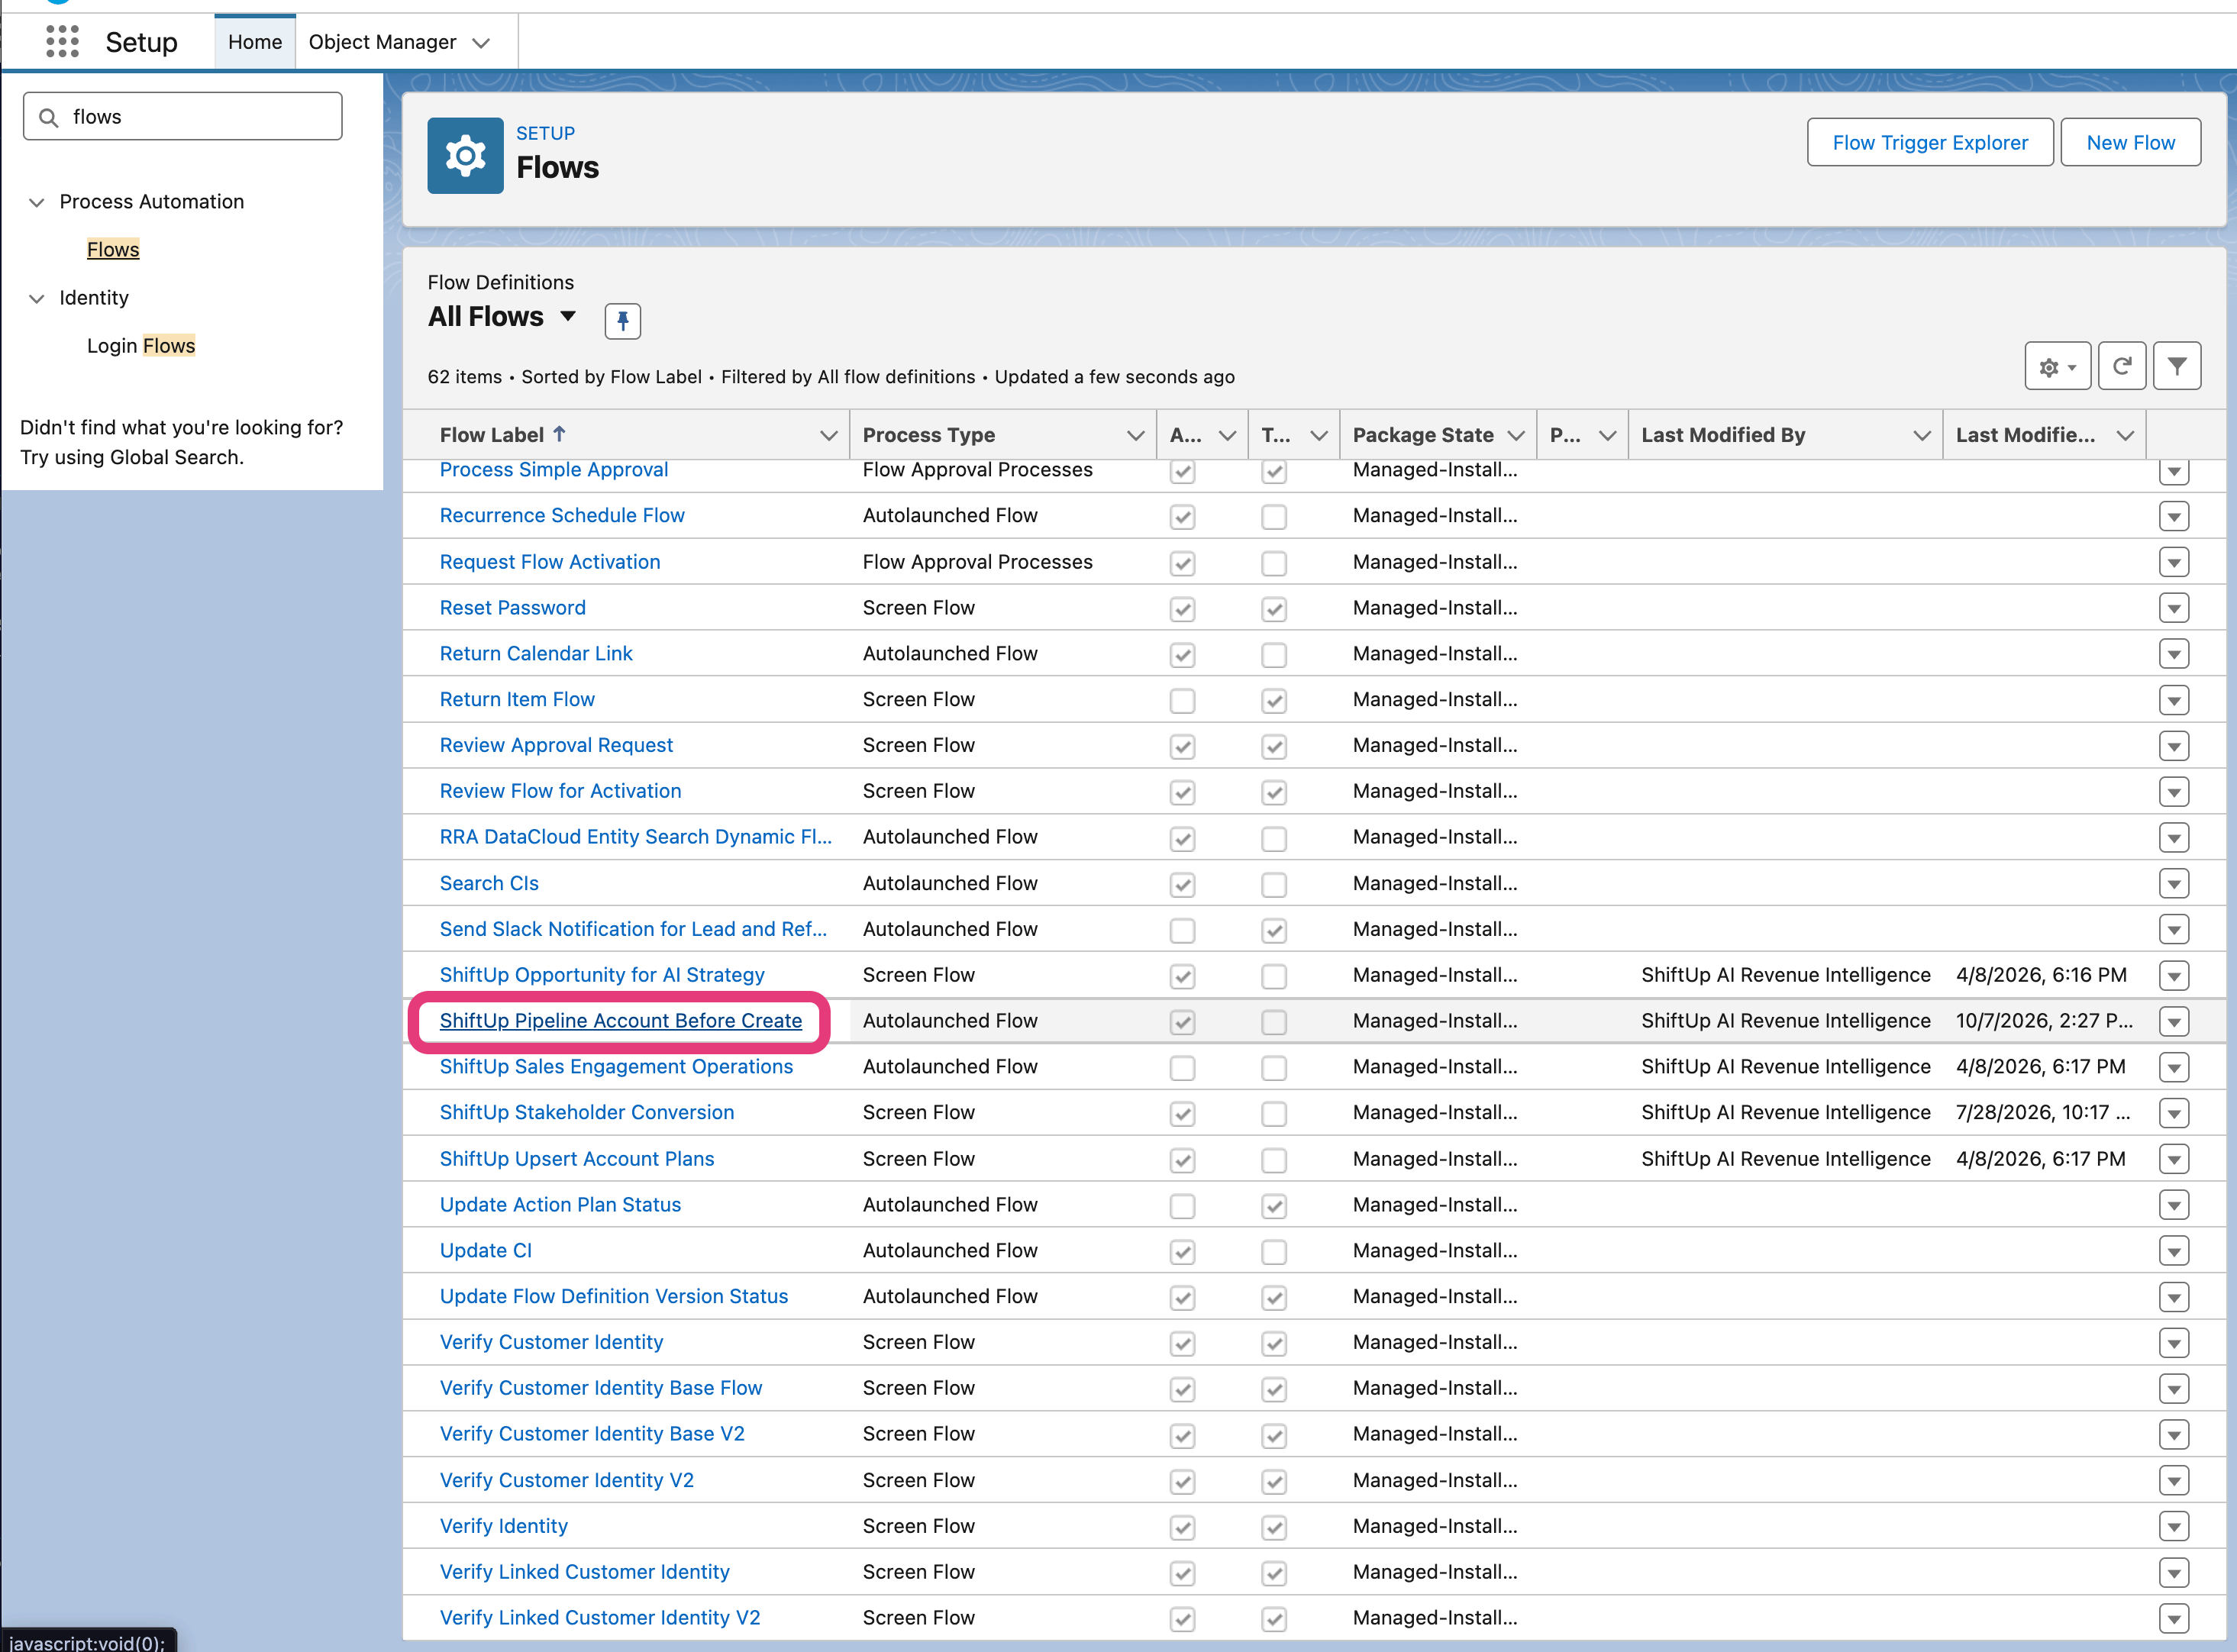
In Salesforce **Setup**, enter **Flows** in Quick Find. Select **Flows**, then open **ShiftUp Pipeline Account Before Create**.
 ## **2. Create your flow override**
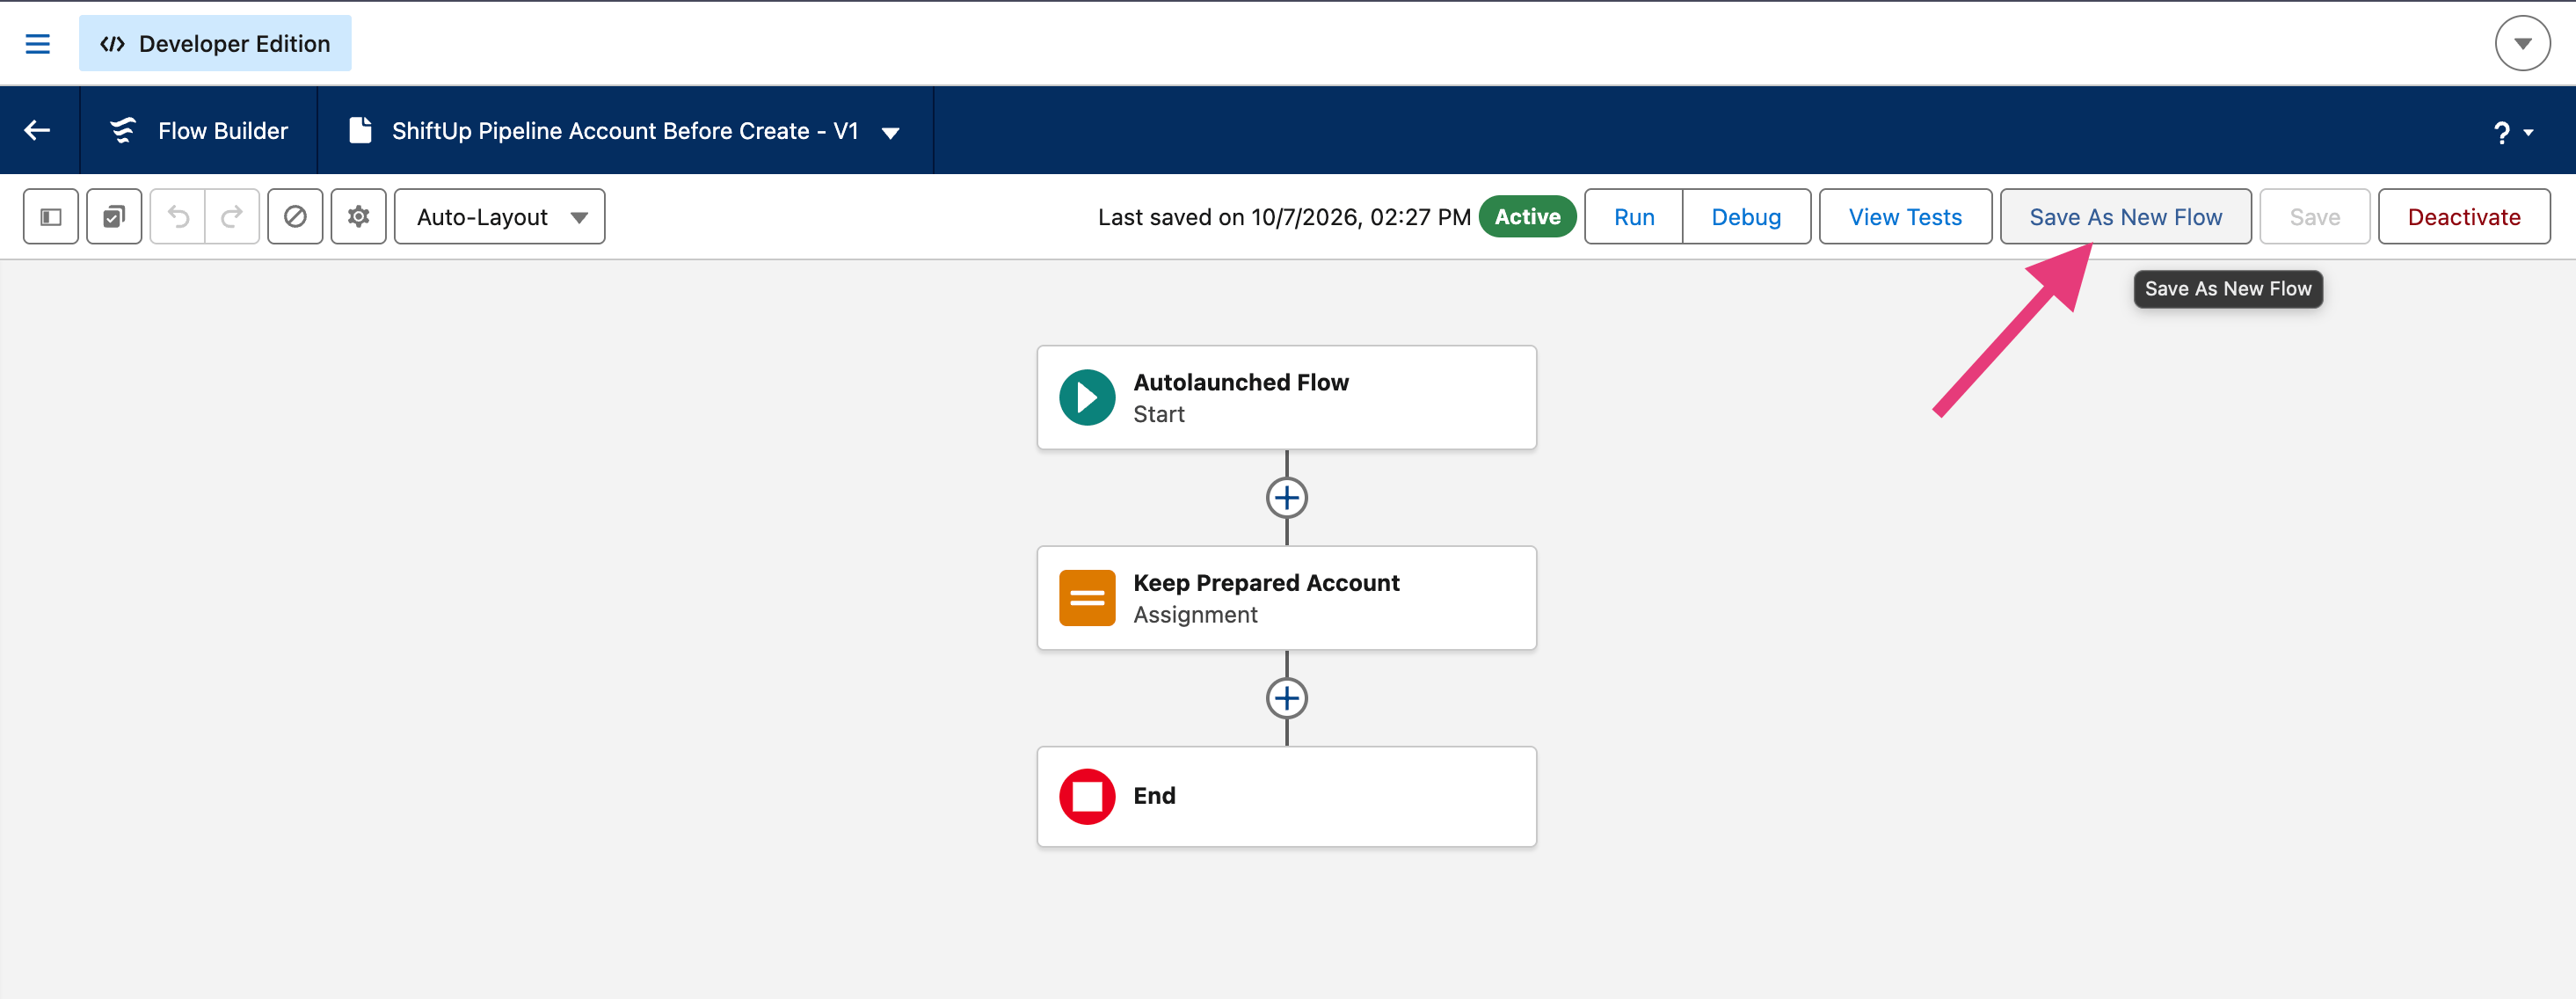
Click **Save As New Flow**.
## **2. Create your flow override**
Click **Save As New Flow**.
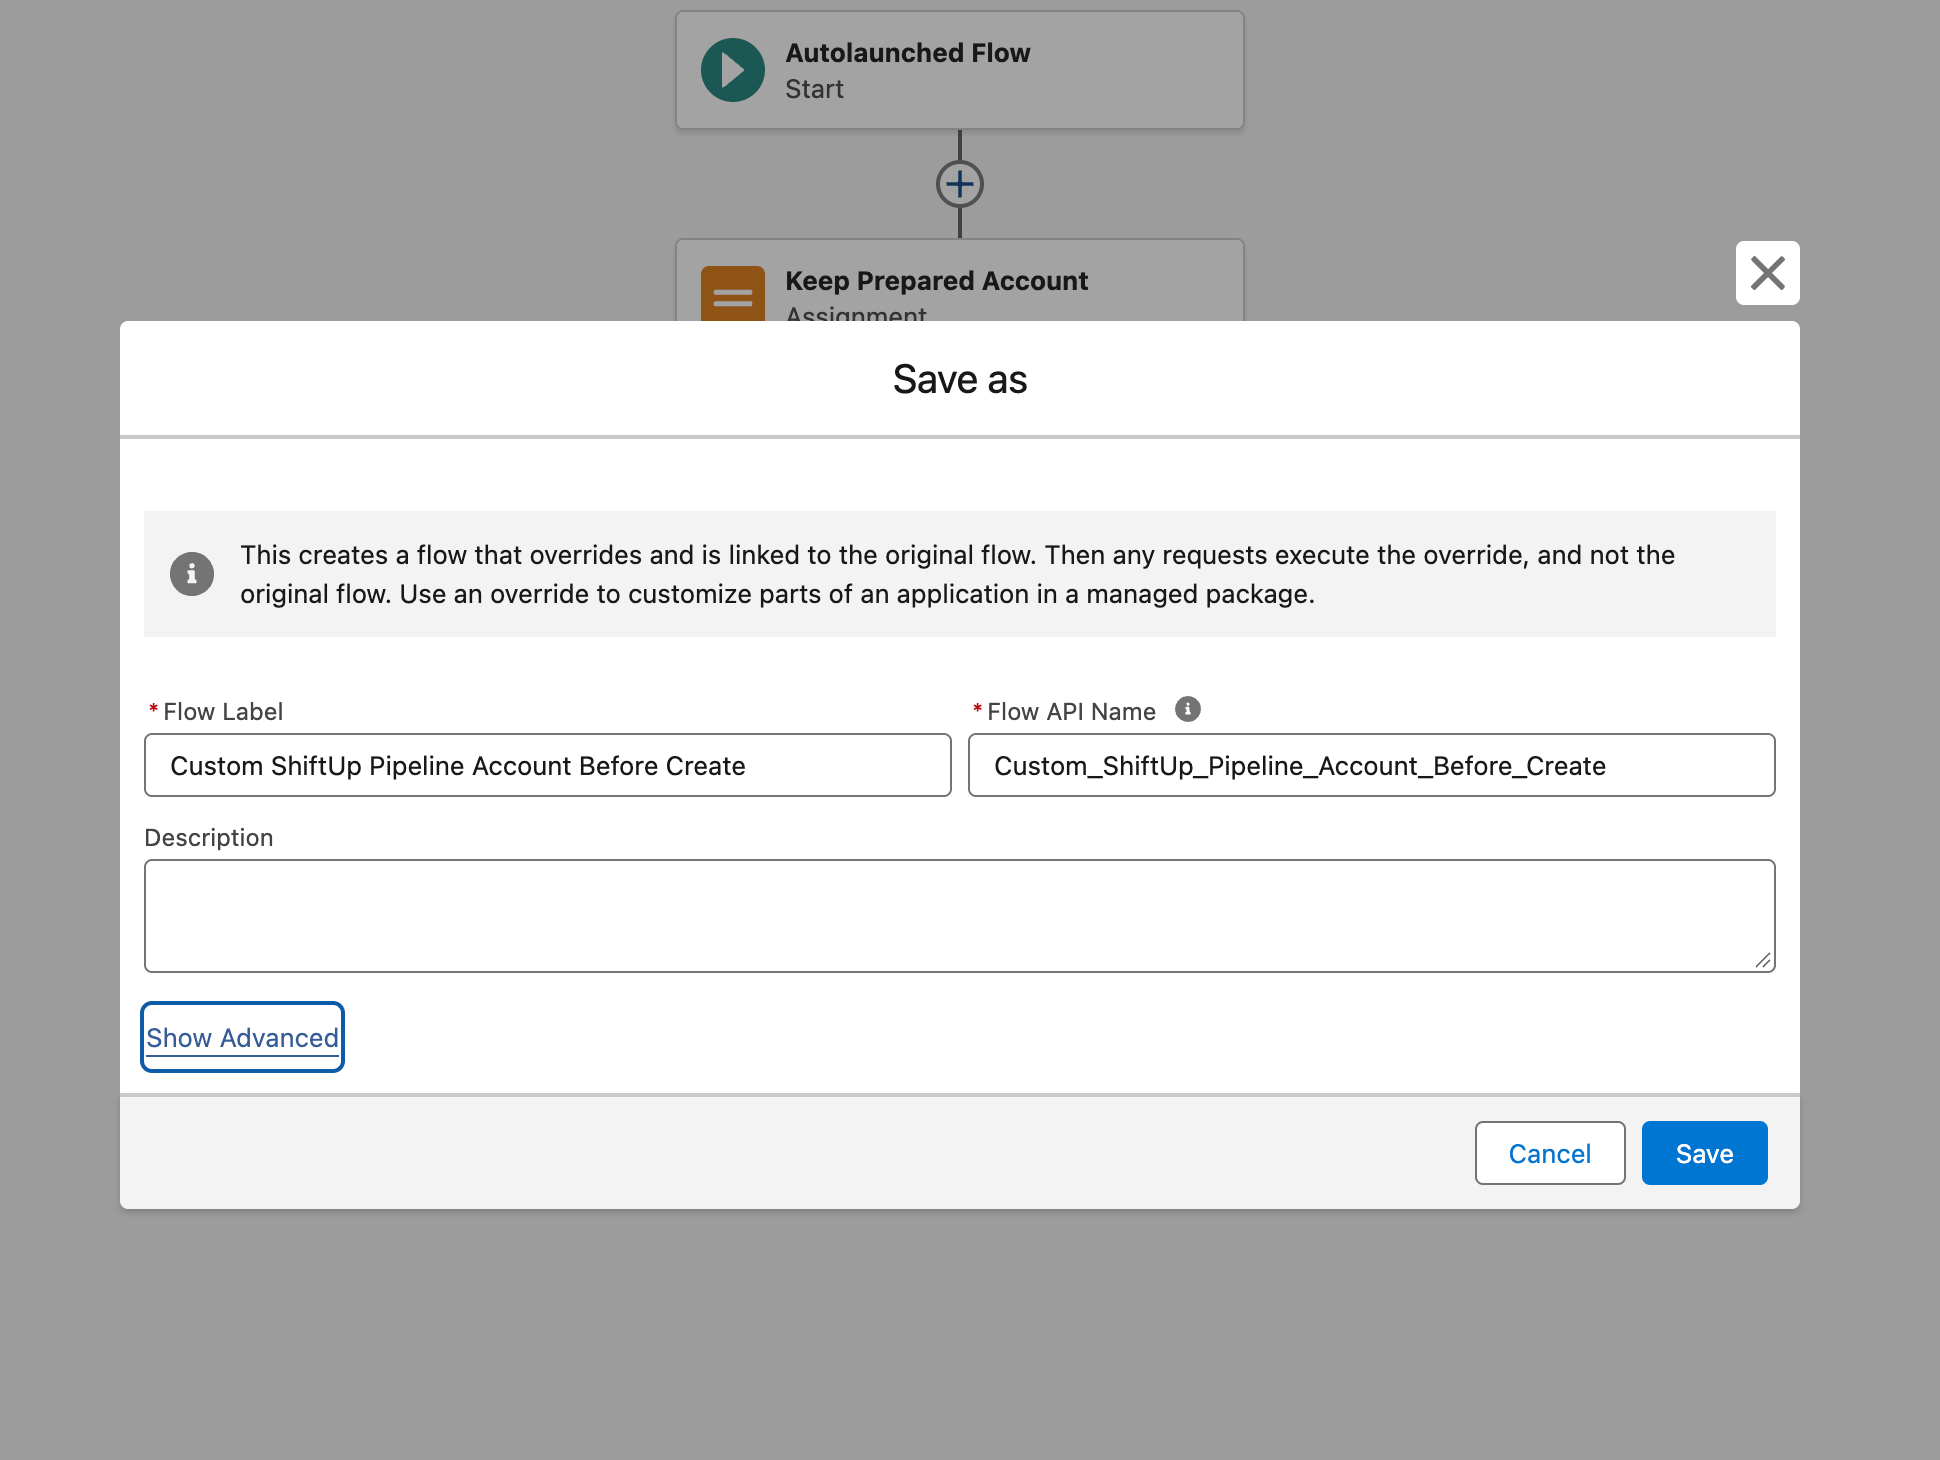
 Enter a descriptive label, such as **Custom ShiftUp Pipeline Account Before Create**, accept the generated API name, and click **Save**. The save dialog explains that the new flow overrides and remains linked to the packaged flow. Confirm the **Override** badge appears in Flow Builder.
 Keep the inherited resources:
| Resource | Required configuration |
| :- | :- |
| `account` | A single **Record** variable for **Account**, available for both input and output. |
| `context` | A single **Apex-Defined** variable of type **GSPipelineAccountCreationContext**, available for input. |
The linked override is what makes Salesforce run your customization automatically when ShiftUp calls the packaged flow.
## **3. Assign your Account fields**
Open the **Keep Prepared Account** Assignment element and rename it **Set Account Fields**. Add assignments to fields on the existing `account` variable, using the **Equals** operator.
| Field | Example value |
| :- | :- |
| Account Type (`account.Type`) | `ShiftUp`, if configured as an allowed picklist value in your org. |
| Record Type ID (`account.RecordTypeId`) | The ID of the Account record type you want to use in this org. |
| A custom required Account field | A valid default for your business process. |
Keep the inherited resources:
| Resource | Required configuration |
| :- | :- |
| `account` | A single **Record** variable for **Account**, available for both input and output. |
| `context` | A single **Apex-Defined** variable of type **GSPipelineAccountCreationContext**, available for input. |
The linked override is what makes Salesforce run your customization automatically when ShiftUp calls the packaged flow.
## **3. Assign your Account fields**
Open the **Keep Prepared Account** Assignment element and rename it **Set Account Fields**. Add assignments to fields on the existing `account` variable, using the **Equals** operator.
| Field | Example value |
| :- | :- |
| Account Type (`account.Type`) | `ShiftUp`, if configured as an allowed picklist value in your org. |
| Record Type ID (`account.RecordTypeId`) | The ID of the Account record type you want to use in this org. |
| A custom required Account field | A valid default for your business process. |
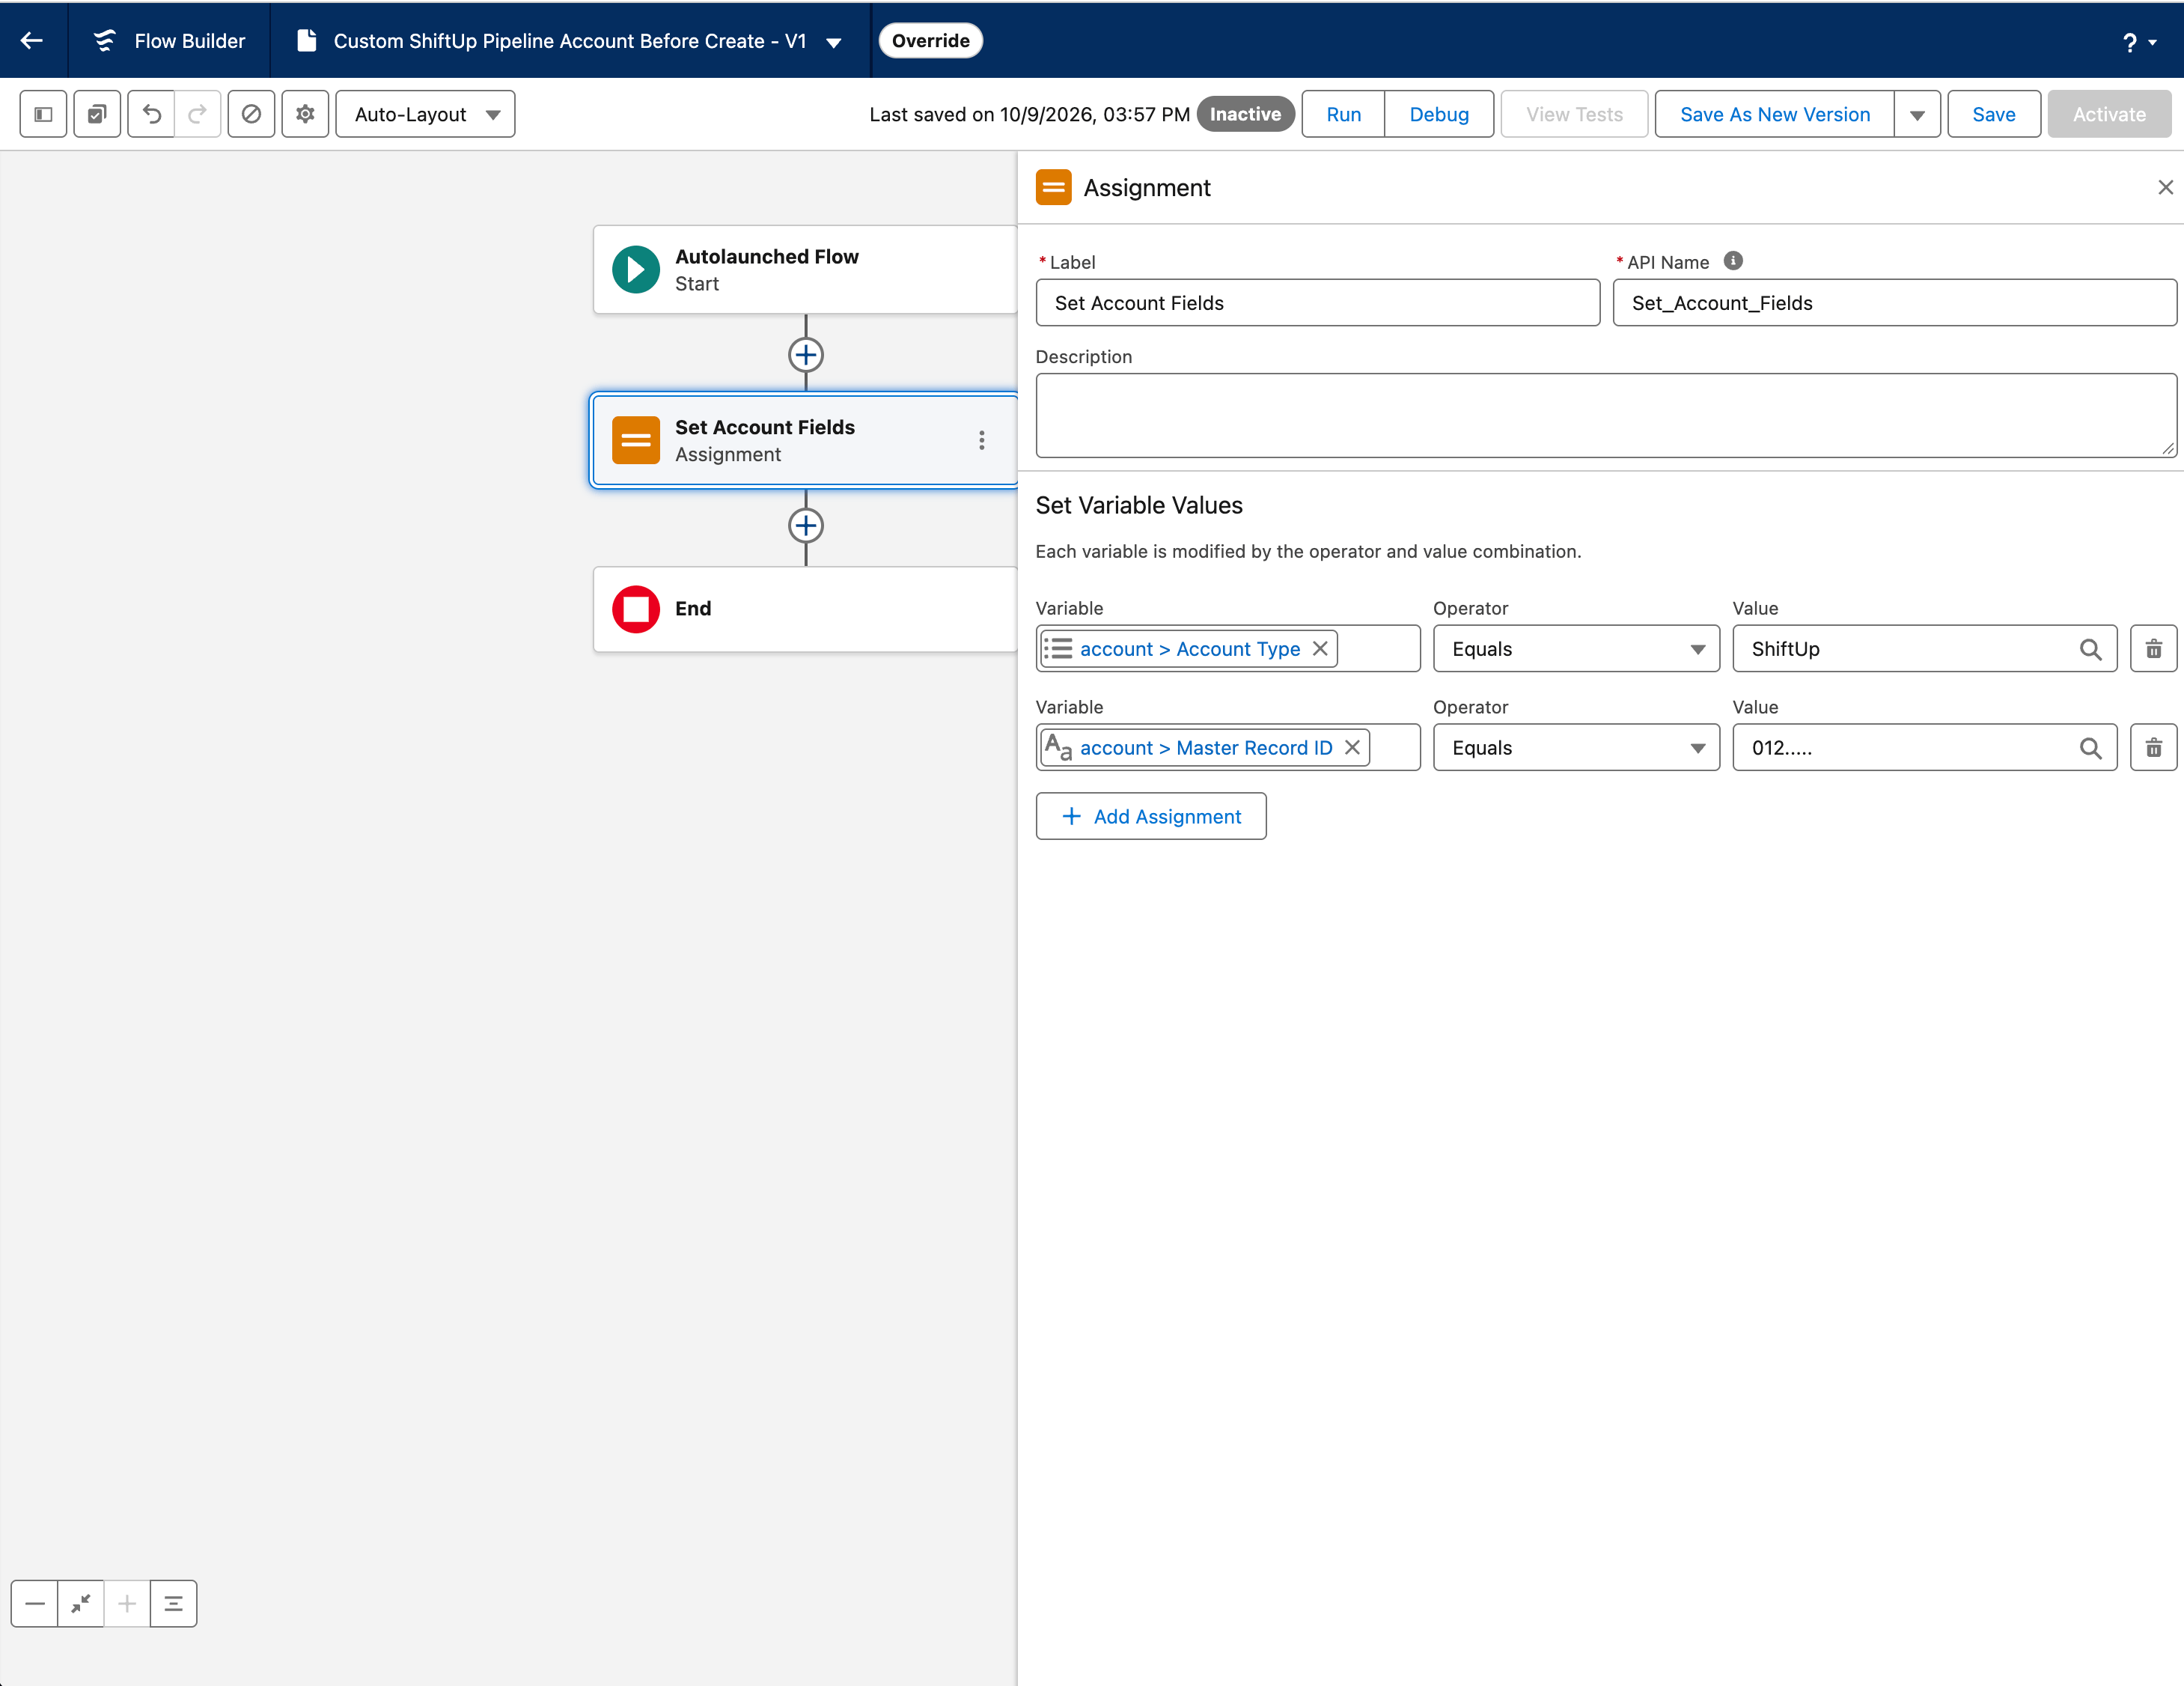 > **Record type correction:** The screenshot's second row selects **Master Record ID**. To assign a record type, select **Record Type ID** (`RecordTypeId`) instead. Use a valid ID from your org; `012…` is only a placeholder.
Modify fields on the supplied Account so its prepared values are retained. Leave **Name**, **OwnerId**, **ParentId**, and **tvggs\_\_Pipeline\_Materialization\_Key\_\_c** unchanged, and leave **Id** empty.
Use this flow to prepare field values. Do not add **Create Records**, **Update Records**, **Delete Records**, pauses, or asynchronous work; ShiftUp saves the returned Account after the flow finishes.
## **4. Add conditional defaults (optional)**
To apply different values by Account role or seller profile, add a **Decision** element and choose a property from the `context` resource.
| Property | Meaning |
| :- | :- |
| `context.accountType` | `Parent` for a new supporting parent; `Target` for the Account being activated, including a standalone Account. |
| `context.sellerProfileId` | The Salesforce ID of the seller profile used for the activation. |
| `context.sellerProfileName` | That seller profile's display name. |
For example, test whether `context.accountType` equals `Parent`, then put a separate Assignment on each decision branch. You can also vary defaults by seller profile. Ensure every branch supplies any required fields.
> **Record type correction:** The screenshot's second row selects **Master Record ID**. To assign a record type, select **Record Type ID** (`RecordTypeId`) instead. Use a valid ID from your org; `012…` is only a placeholder.
Modify fields on the supplied Account so its prepared values are retained. Leave **Name**, **OwnerId**, **ParentId**, and **tvggs\_\_Pipeline\_Materialization\_Key\_\_c** unchanged, and leave **Id** empty.
Use this flow to prepare field values. Do not add **Create Records**, **Update Records**, **Delete Records**, pauses, or asynchronous work; ShiftUp saves the returned Account after the flow finishes.
## **4. Add conditional defaults (optional)**
To apply different values by Account role or seller profile, add a **Decision** element and choose a property from the `context` resource.
| Property | Meaning |
| :- | :- |
| `context.accountType` | `Parent` for a new supporting parent; `Target` for the Account being activated, including a standalone Account. |
| `context.sellerProfileId` | The Salesforce ID of the seller profile used for the activation. |
| `context.sellerProfileName` | That seller profile's display name. |
For example, test whether `context.accountType` equals `Parent`, then put a separate Assignment on each decision branch. You can also vary defaults by seller profile. Ensure every branch supplies any required fields.
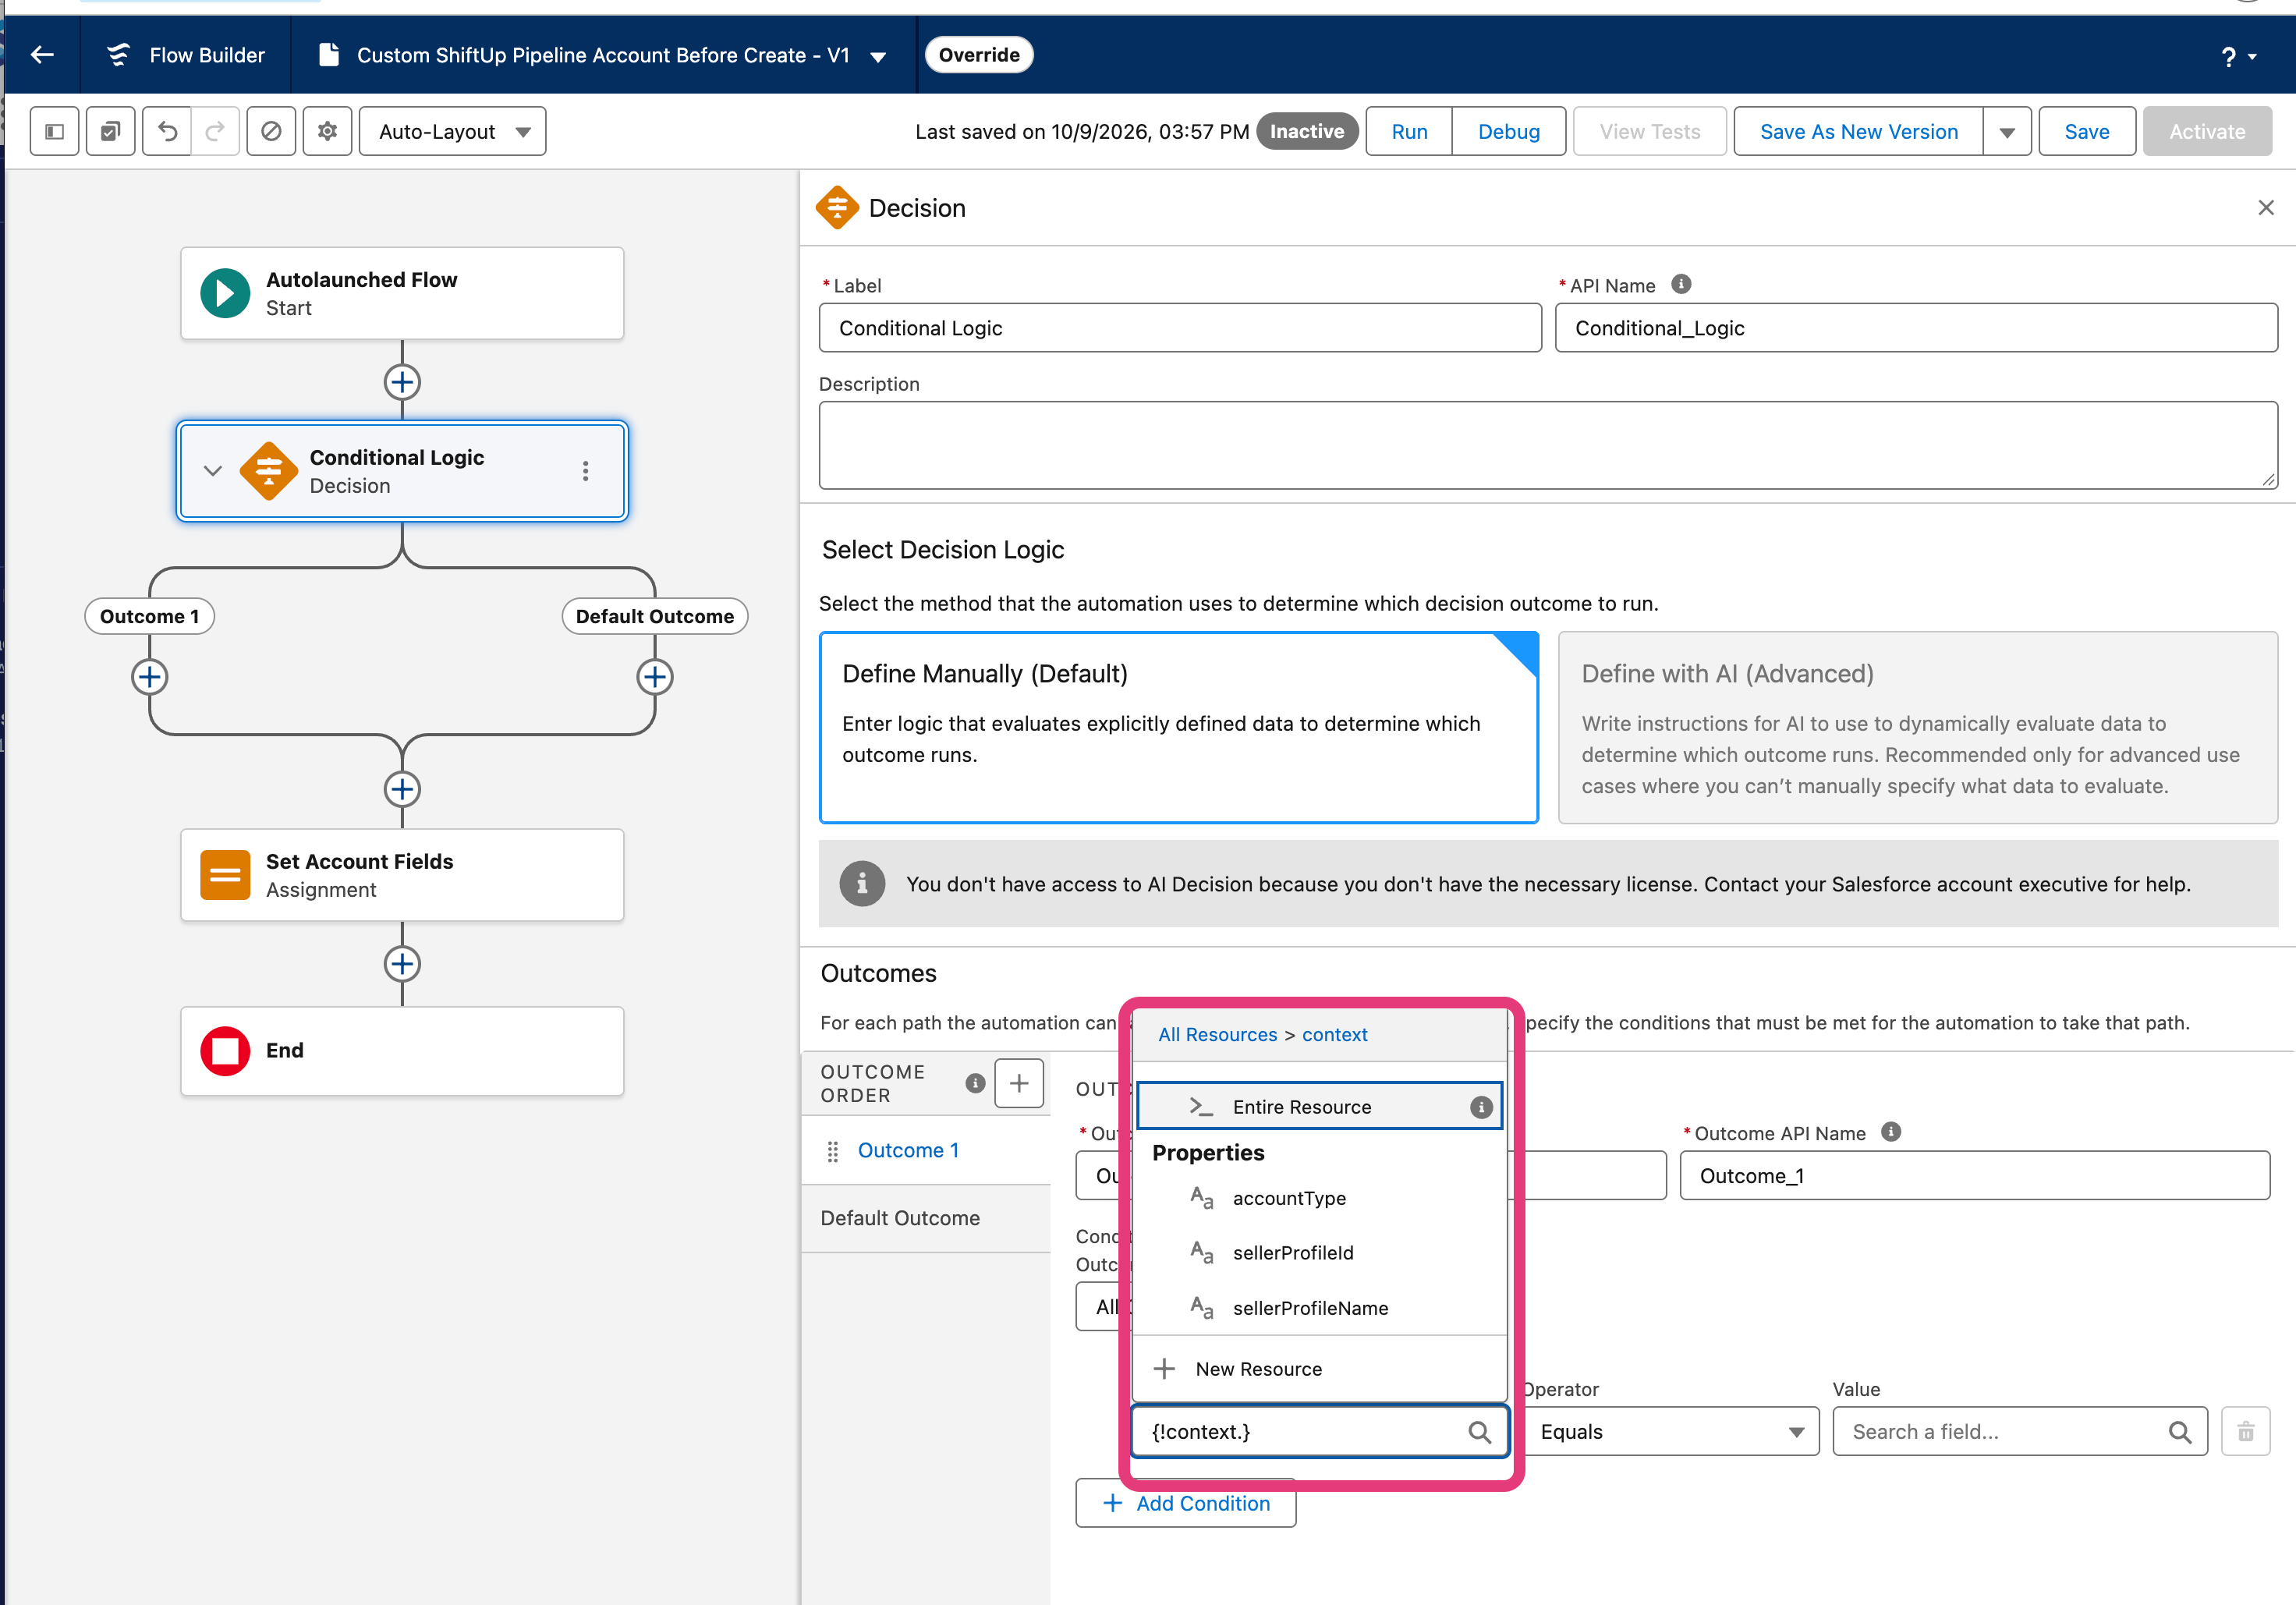 `context.accountType` identifies the Account's role in this creation process. The Salesforce Account **Type** field is a separate value that you assign on `account`.
## **5. Save and activate**
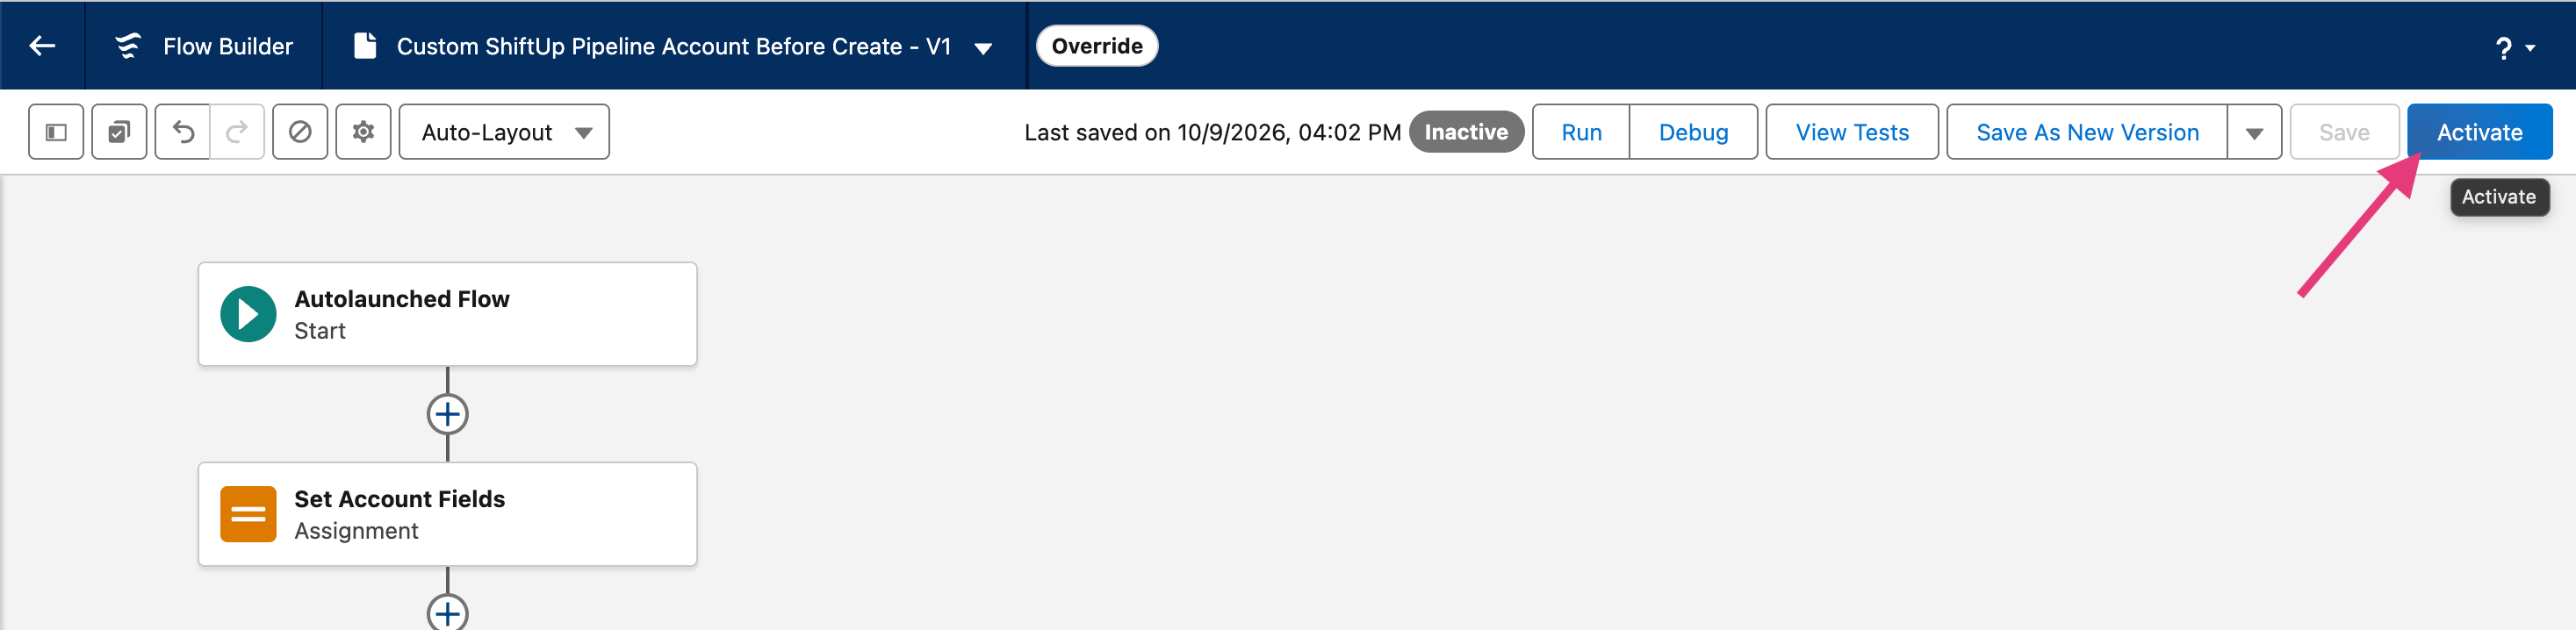
Click **Save**, then **Activate**. Confirm your custom flow shows **Active** and retains the **Override** badge.
`context.accountType` identifies the Account's role in this creation process. The Salesforce Account **Type** field is a separate value that you assign on `account`.
## **5. Save and activate**
Click **Save**, then **Activate**. Confirm your custom flow shows **Active** and retains the **Override** badge.
 ## **6. (Optional) Give the integration user access**
ShiftUp's integration user runs the flow during account creation. If you have enabled restricted access to your custom flow then you must grant access to your **custom override** flow.
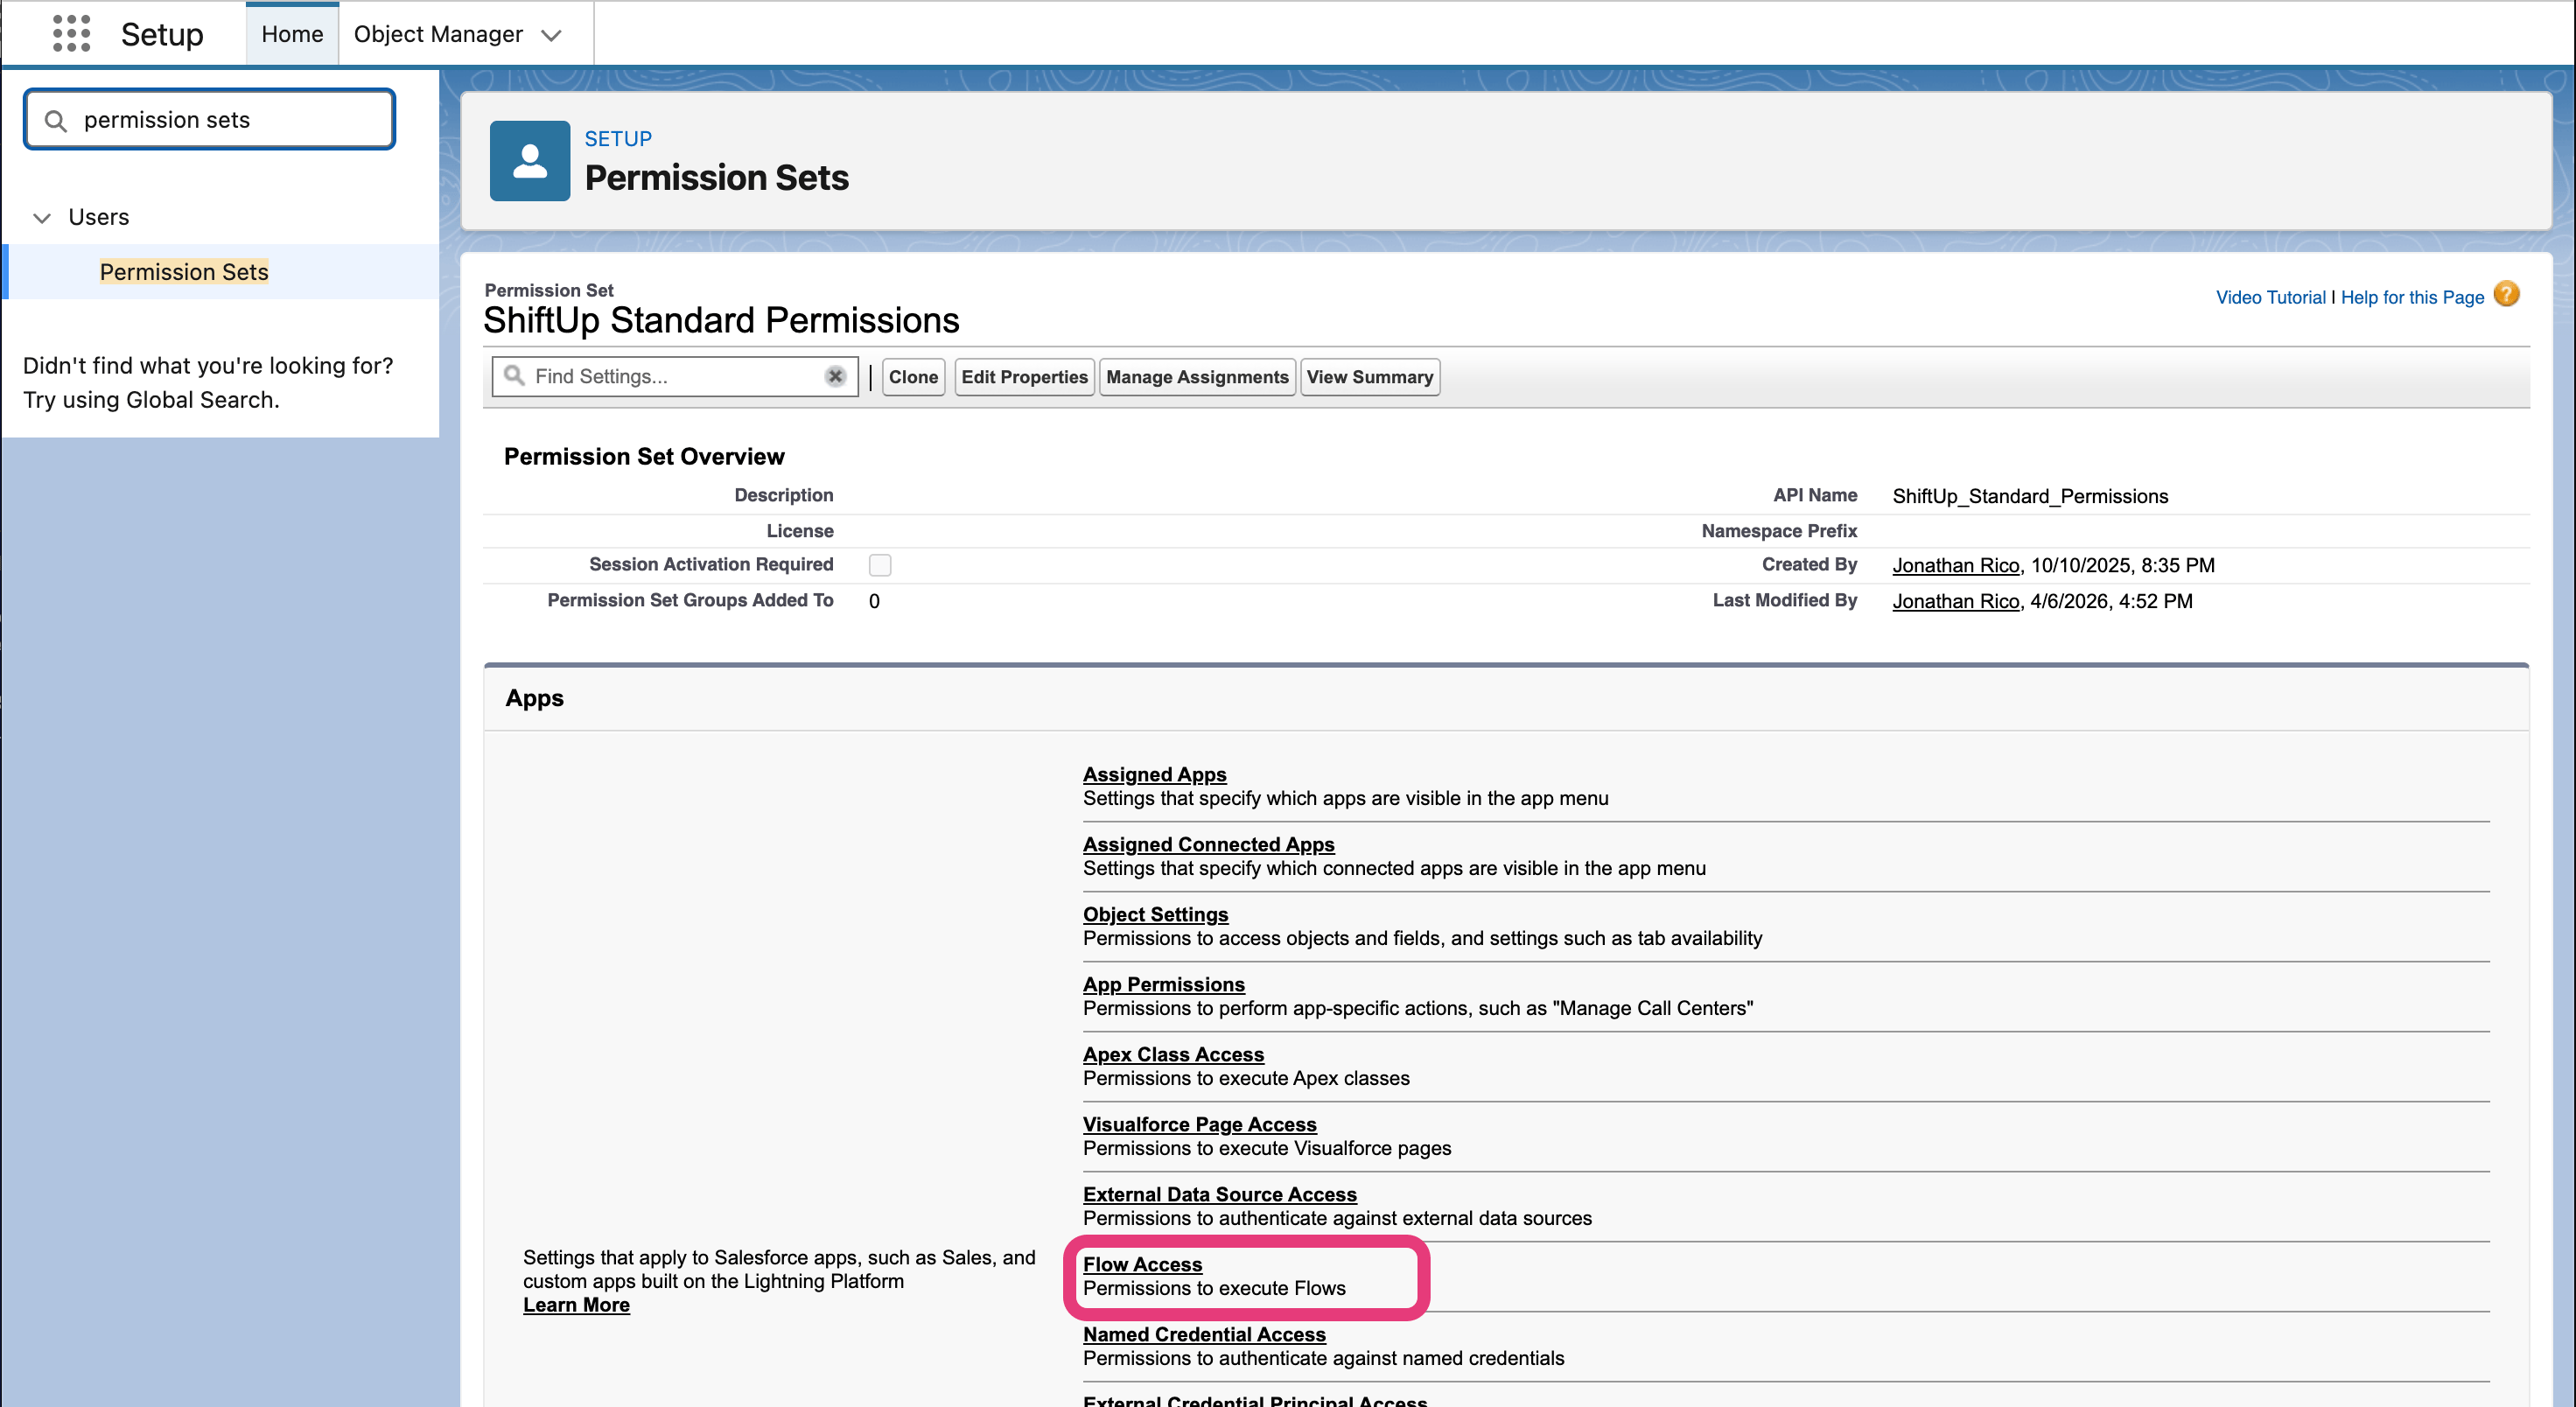
In **Setup → Permission Sets**, open **ShiftUp Standard Permissions**, as shown below, or the editable permission set your org uses for the integration user.
## **6. (Optional) Give the integration user access**
ShiftUp's integration user runs the flow during account creation. If you have enabled restricted access to your custom flow then you must grant access to your **custom override** flow.
In **Setup → Permission Sets**, open **ShiftUp Standard Permissions**, as shown below, or the editable permission set your org uses for the integration user.
 Under **Apps**, select **Flow Access**, then **Edit**.
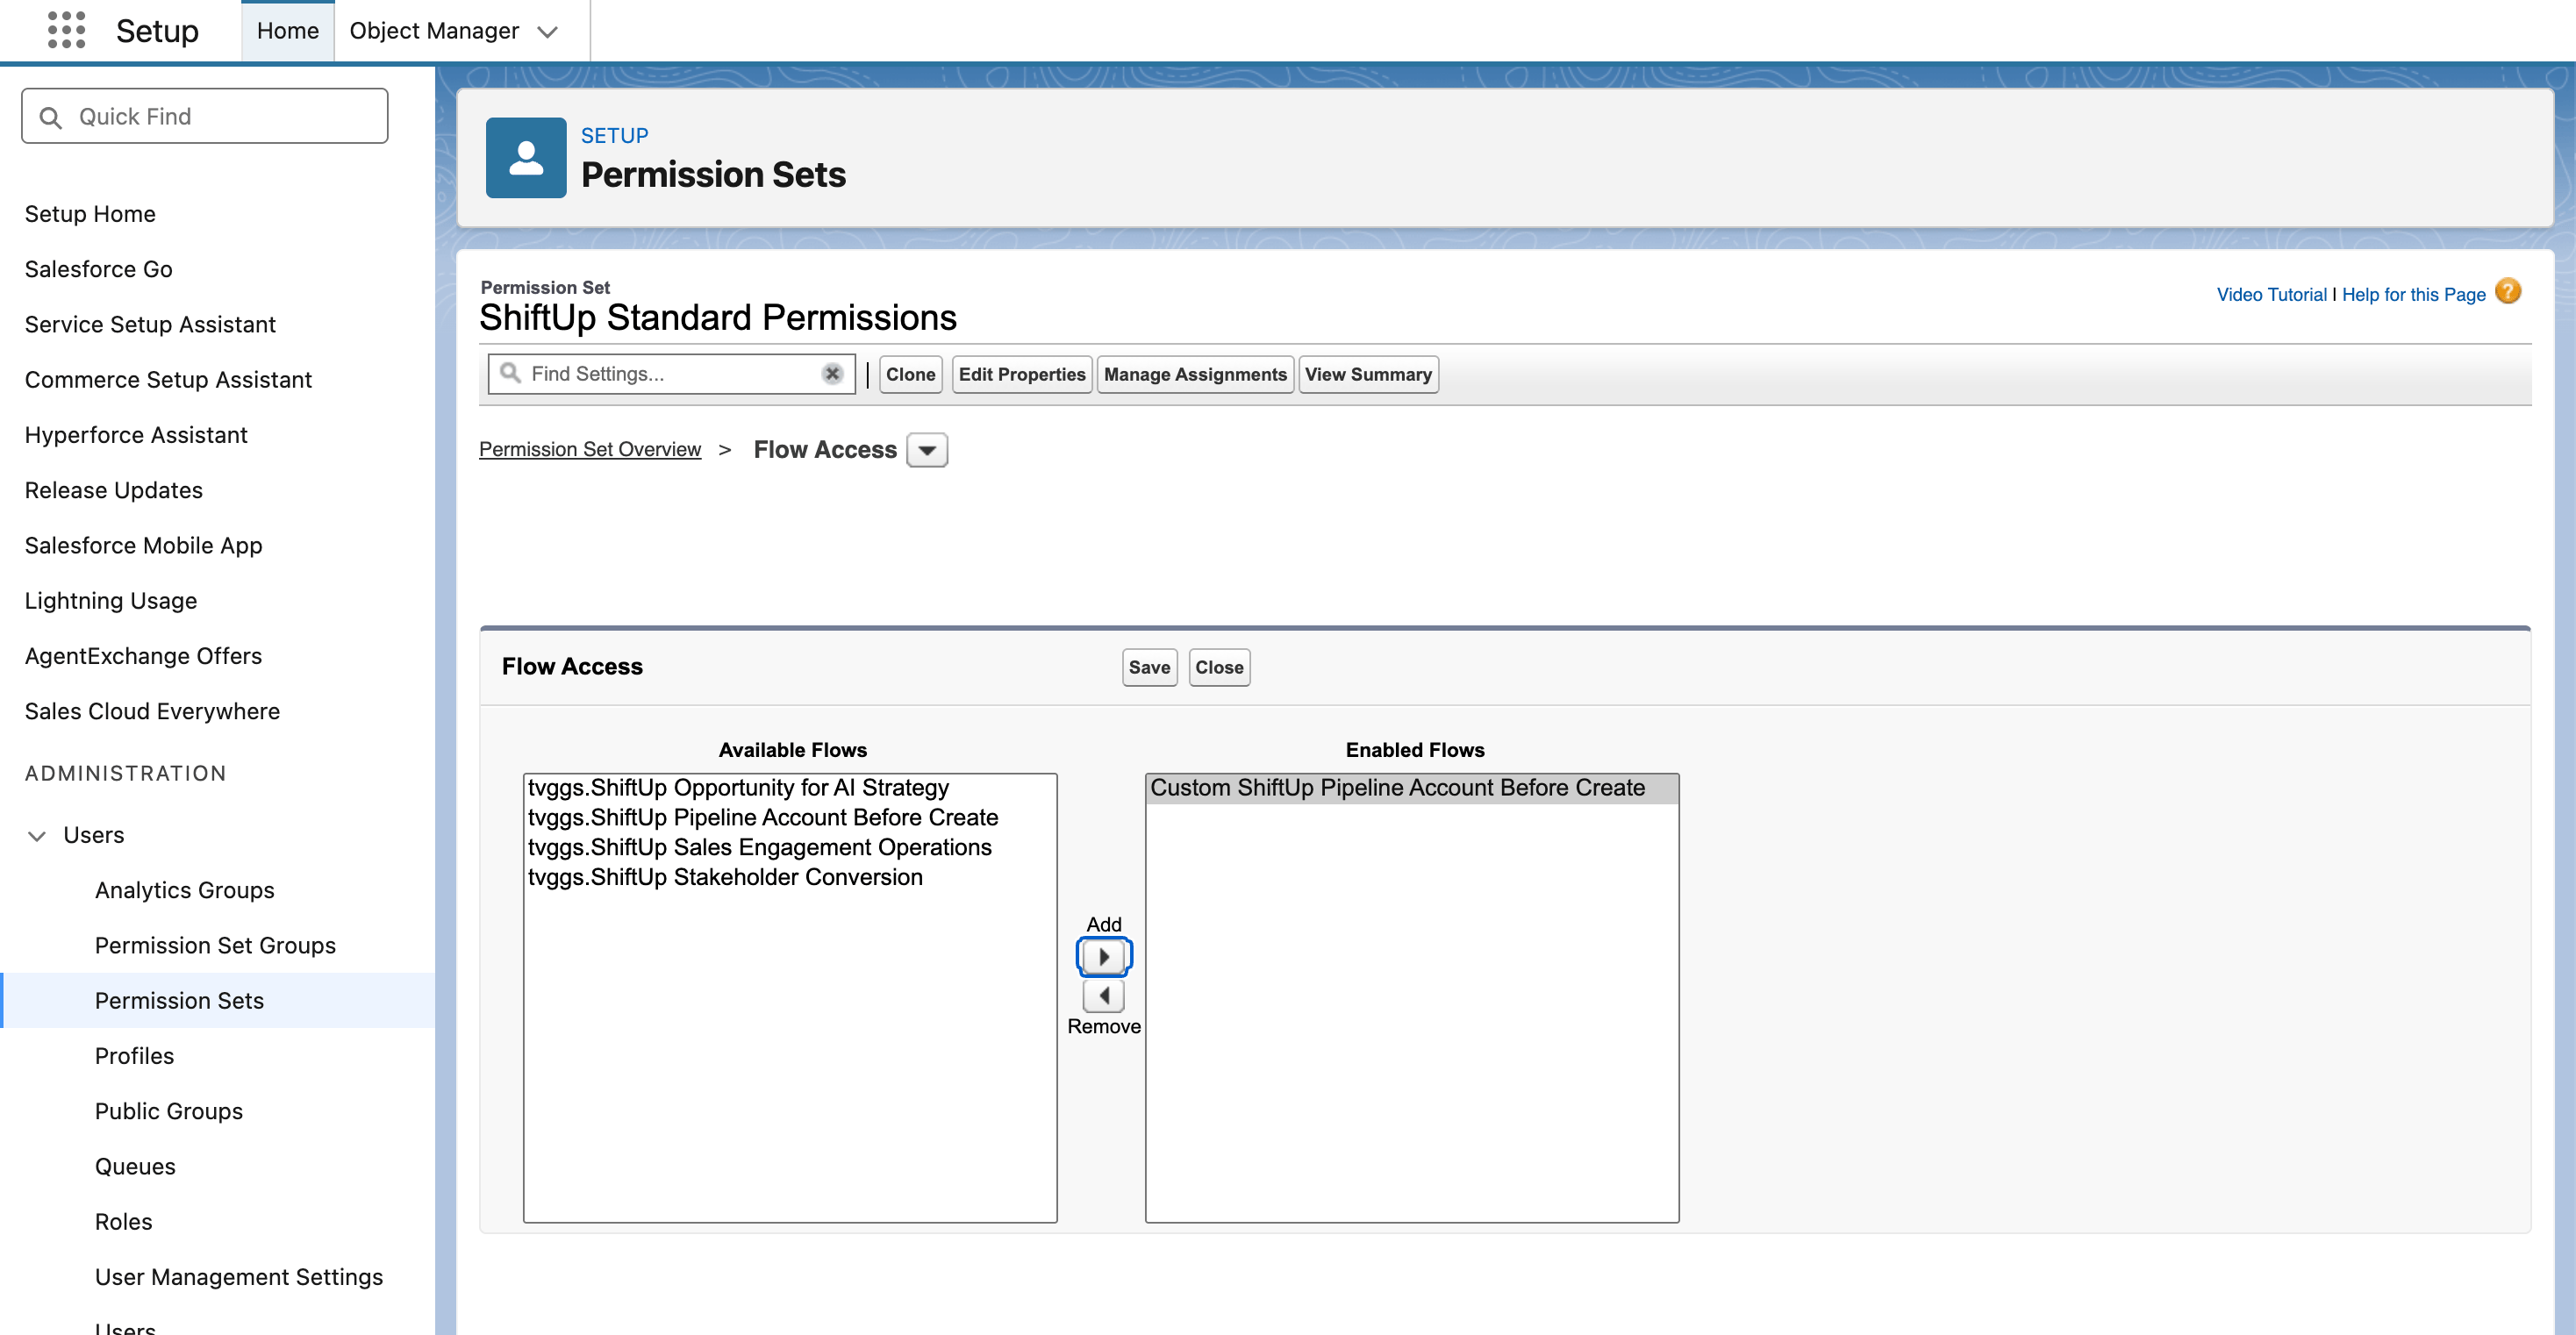
 Select **Custom ShiftUp Pipeline Account Before Create**, move it to **Enabled Flows**, and click **Save**.
 Use **Manage Assignments** to confirm this permission set is assigned to the integration user; add the user if needed. Also confirm the user has **Run Flows**, normally provided by ShiftUp's integration permissions. If missing, enable it in an assigned permission set under **App Permissions → Flow and Flow Orchestration**.
If the custom flow is missing from **Available Flows**, return to **Setup → Flows**, open its action menu, and choose **Edit Access**. Enable the option to restrict access to enabled profiles or permission sets, save, and return to **Flow Access**. Restricted flows require explicit access even for users with general flow permissions. See [Salesforce's flow access guidance](https://help.salesforce.com/s/articleView?id=platform.flow_distribute_security.htm\&language=en_US\&type=5).
## **Verify the result**
Activate a strategy candidate that creates a new Account through ShiftUp, then check the resulting Account's field values. If your setup creates a new parent too, check both Accounts. Reusing an existing Account should leave its fields unchanged.
If creation fails, check the active override, integration-user access, required fields, and protected fields listed above. Correct the issue and retry. A failure in this flow stops Account creation and rolls back new records from that creation attempt.
To return to ShiftUp's default behavior, deactivate the custom override. This affects future creation attempts; Accounts already created keep their saved values.
This documentation is built and hosted on [Mintlify](https://mintlify.com), a developer documentation platform.
Use **Manage Assignments** to confirm this permission set is assigned to the integration user; add the user if needed. Also confirm the user has **Run Flows**, normally provided by ShiftUp's integration permissions. If missing, enable it in an assigned permission set under **App Permissions → Flow and Flow Orchestration**.
If the custom flow is missing from **Available Flows**, return to **Setup → Flows**, open its action menu, and choose **Edit Access**. Enable the option to restrict access to enabled profiles or permission sets, save, and return to **Flow Access**. Restricted flows require explicit access even for users with general flow permissions. See [Salesforce's flow access guidance](https://help.salesforce.com/s/articleView?id=platform.flow_distribute_security.htm\&language=en_US\&type=5).
## **Verify the result**
Activate a strategy candidate that creates a new Account through ShiftUp, then check the resulting Account's field values. If your setup creates a new parent too, check both Accounts. Reusing an existing Account should leave its fields unchanged.
If creation fails, check the active override, integration-user access, required fields, and protected fields listed above. Correct the issue and retry. A failure in this flow stops Account creation and rolls back new records from that creation attempt.
To return to ShiftUp's default behavior, deactivate the custom override. This affects future creation attempts; Accounts already created keep their saved values.
This documentation is built and hosted on [Mintlify](https://mintlify.com), a developer documentation platform.